- Sending/Receiving Emails
- Sending Emails
- Receiving Emails
- Mail Accounts Configured via the OTRS GUI
-
Via Command Line Program and Procmail (
otrs.Console.pl Maint::PostMaster::Read) -
Fetching emails via POP3 or IMAP and fetchmail for
otrs.Console.pl Maint::PostMaster::Read - Filtering/Dispatching by OTRS/PostMaster Modules (for More Complex Dispatching)
- Troubleshooting Email Filtering
- Secure Email with PGP
- Secure Email with S/MIME
OTRS can send out emails via Sendmail, Postfix, Qmail or Exim. The default configuration is to use Sendmail and should work out-of-the-box.
You can configure the sendmail settings via the graphical configuration frontend
(Framework::Core::Sendmail).
OTRS can send emails via SMTP (Simple Mail Transfer Protocol / RFC 821) or Secure SMTP.
The SMTP server settings can be configured via the SysConfig
(Framework::Core::Sendmail).
If you don't see SMTPS available as an option, the required Perl modules are missing. In that case,
please refer to "Installation of Perl modules required for
OTRS" for instructions.
Before sending, OTRS will queue all emails and let a Daemon task asynchronously handle them in due time. On a normal installation, the emails will be sent out every minute by the OTRS Daemon.
To check the status of email sending, you can use the bin/otrs.Console.pl
Maint::Email::MailQueue console command with --list switch.
shell> cd /opt/otrs/
shell> bin/otrs.Console.pl Maint::Email::MailQueue --list
  +----+-----------+----------+----------------+--------------------+----------+----------------+-------------------+
  | ID | ArticleID | Attempts | Sender         | Recipient          | Due Time | Last SMTP Code | Last SMTP Message |
  +----+-----------+----------+----------------+--------------------+----------+----------------+-------------------+
  | 28 | 284       | 0        | otrs@localhost | marketing@otrs.com | -        | -              | -                 |
  | 29 | 285       | 0        | otrs@localhost | feedbac@otrs.com   | -        | -              | -                 |
  +----+-----------+----------+----------------+--------------------+----------+----------------+-------------------+

  Mail queue contains 2 message(s)
In order to filter the table, you can use --filter argument, for example with ID of
the send job.
shell> bin/otrs.Console.pl Maint::Email::MailQueue --list --filter ID::28
  +----+-----------+----------+----------------+--------------------+----------+----------------+-------------------+
  | ID | ArticleID | Attempts | Sender         | Recipient          | Due Time | Last SMTP Code | Last SMTP Message |
  +----+-----------+----------+----------------+--------------------+----------+----------------+-------------------+
  | 28 | 284       | 0        | otrs@localhost | marketing@otrs.com | -        | -              | -                 |
  +----+-----------+----------+----------------+--------------------+----------+----------------+-------------------+

  Mail queue contains 1 message(s)

Done.
To delete emails queued for sending, specify either --delete-all switch, or
--delete with some filter active.
shell> bin/otrs.Console.pl Maint::Email::MailQueue --delete --filter ID::28
Deleted messages from mail queue.
Done.
You can also manually send email without waiting for OTRS Daemon task to kick in. Simply specify the
--send switch.
shell> bin/otrs.Console.pl Maint::Email::MailQueue --send
1 message(s) successfully sent!
Done.
OTRS is able to receive emails from POP3, POP3S, IMAP and IMAPS mail accounts.
Configure your mail accounts via the PostMaster Mail Accounts link on the Admin page.
If a new mail account is to be created (see figure below), then its mail server name, login name and password must be specified. Also, you need to select the mail server type, which can be POP3, POP3S, IMAP or IMAPS. If you don't see your server type available as an option, the required Perl modules are missing on your system. In that case, please refer to Installation of Perl modules required for OTRS for instructions.
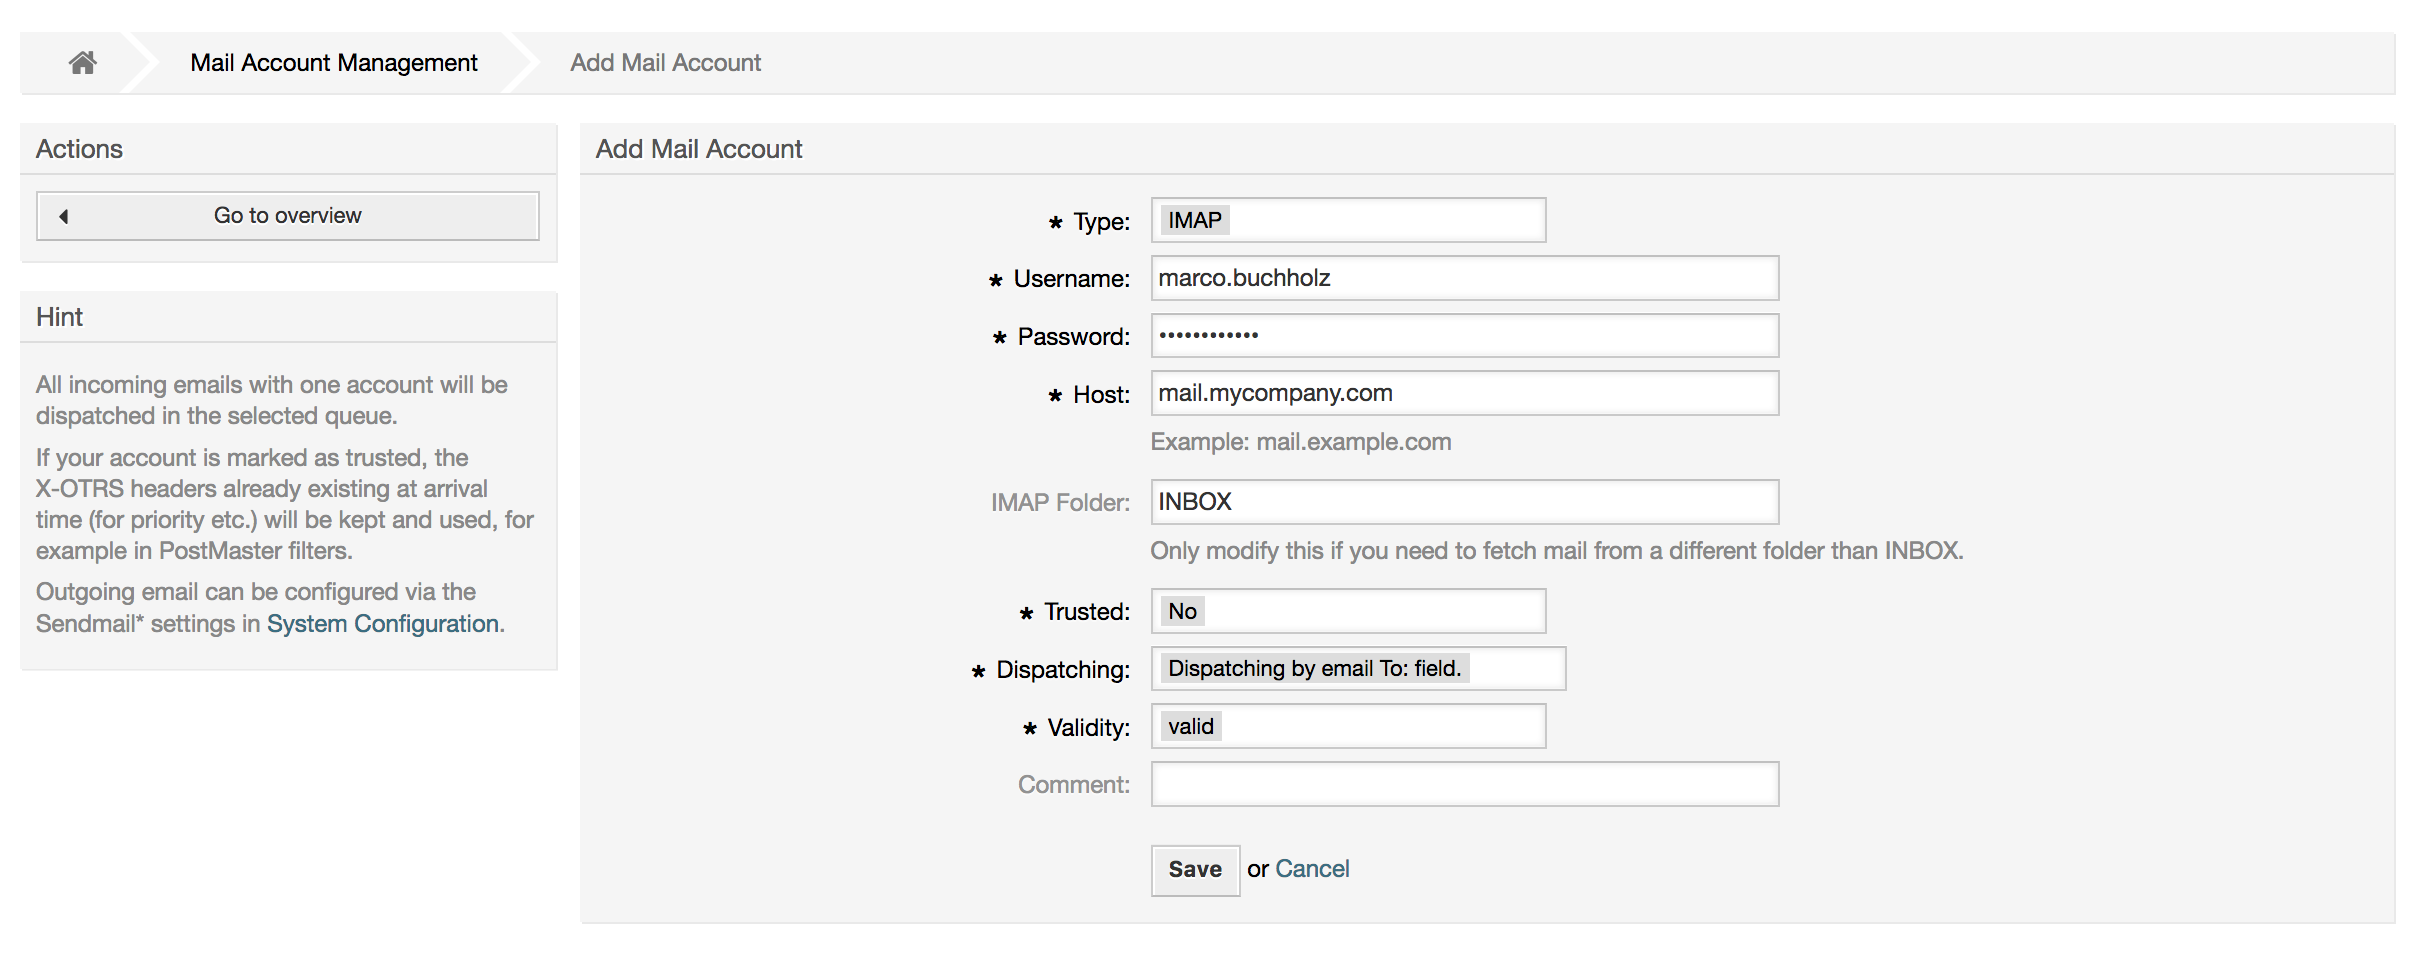
If you select Yes for the value of the Trusted option, any X-OTRS headers attached to an incoming message are evaluated and executed. Because the X-OTRS header can execute some actions in the ticket system, you should set the Trusted option to Yes only for known senders. X-OTRS-Headers are used by the filter module in OTRS. The X-OTRS headers are explained in this table in more detail. Any postmaster filter rules created are executed, irrespective of the Trusted option's setting.
The distribution of incoming messages can be controlled if they need to be sorted by queue or by the content of the To: field. For the Dispatching field, if Dispatching by selected queue is selected, all incoming messages will be sorted into the specified queue. The address where the mail was sent to is disregarded in this case. If Dispatching by email To: field is selected, the system checks if a queue is linked with the address in the To: field of the incoming mail. You can link an address to a queue in the E-mail address management section of the Admin page. If the address in the To: field is linked with a queue, the new message will be sorted into the linked queue. If no link is found between the address in the To: field and any queue, then the message flows into the Raw queue in the system, which is the PostmasterDefaultQueue after a default installation.
All data for the mail accounts are saved in the OTRS database. The bin/otrs.Console.pl
Maint::PostMaster::MailAccountFetch command uses the settings in the database and fetches the
mail. You can execute it manually to check if all your mail settings are working properly.
On a normal installation, the mail will be fetched every 10 minutes by the OTRS Daemon.
Note
When fetching mail, OTRS deletes the mail from the POP or IMAP server. There is no option to also keep a copy on the server. If you want to retain a copy on the server, you should create forwarding rules on your mail server. Please consult your mail server documentation for details.
If you cannot use mail accounts to get the email into OTRS, the command line program
bin/otrs.Console.pl Maint::PostMaster::Read might be a way around the problem. It
takes the mails via STDIN and pipes them directly into OTRS. That means email will be available in your
OTRS system if the MDA (mail delivery agent, e.g. procmail) executes this program.
To test bin/otrs.Console.pl Maint::PostMaster::Read without an MDA, execute the
command of the following script.
linux:/opt/otrs# cd bin
linux:/opt/otrs/bin# cat ../doc/sample_mails/test-email-1.box | ./otrs.Console.pl Maint::PostMaster::Read
linux:/opt/otrs/bin#
Script: Testing PostMaster without the MDA.
If the email is shown in the QueueView, then your setup is working.
Example 4.2. Routing via Procmail Using otrs.Console.pl
In order to route mails in a specific queue using otrs.Console.pl use the following example.
| $SYS_HOME/bin/otrs.Console.pl Maint::PostMaster::Read --target-queue=QUEUENAME
When sorting to a subqueue, you must separate the parent and child queue with a
::.
| $SYS_HOME/bin/otrs.Console.pl Maint::PostMaster::Read --target-queue=QUEUENAME::SUBQUEUE
Procmail is a very common e-mail filter in Linux environments. It is installed on most systems. If not, have a look at the procmail homepage.
To configure procmail for OTRS (based upon a procmail configured MTA such as sendmail, postfix, exim or
qmail), use the ~otrs/.procmailrc.dist file and copy it to
.procmailrc and add the lines of the script below.
SYS_HOME=$HOME
PATH=/bin:/usr/bin:/usr/local/bin
# --
# Pipe all email into the PostMaster process.
# --
:0 :
| $SYS_HOME/bin/otrs.Console.pl Maint::PostMaster::Read
Script: Configuring procmail for OTRS.
All email sent to the local OTRS user will be piped into bin/otrs.Console.pl
Maint::PostMaster::Read and then shown in your QueueView.
In order to get email from your mail server, via a POP3 or IMAP mailbox, to the OTRS machine/local OTRS account and to procmail, use fetchmail.
Note
A working SMTP configuration on the OTRS machine is required.
You can use the .fetchmailrc.dist in the home directory of OTRS and copy it to
.fetchmailrc. Modfiy/change it for your needs (see the Example below).
Example 4.3. .fetchmailrc
#poll (mailserver) protocol POP3 user (user) password (password) is (localuser)
poll mail.example.com protocol POP3 user joe password mama is otrs
Don't forget to set the .fetchmailrc to 710 (chmod 710
.fetchmailrc)!
With the .fetchmailrc from the Example above, all email will be forwarded to the
local OTRS account, if the command fetchmail -a is executed. Set up a cronjob with
this command if you want to fetch the mails regularly.
If you use the bin/otrs.Console.pl Maint::PostMaster::Read or
bin/otrs.Console.pl Maint::PostMaster::MailAccountFetch method, you can insert or
modify X-OTRS header entries with the PostMaster filter modules. With the X-OTRS headers, the ticket
system can execute some actions on incoming mails, sort them into a specific queue, change the priority
or change the customer ID, for example. More information about the X-OTRS headers are available in the
section about adding mail accounts from the OTRS
Admin page.
There are some default filter modules:
Note
The job name (e.g. $Self->{'PostMaster::PreFilterModule'}->{'JobName'}) needs to be unique!
Kernel::System::PostMaster::Filter::Match is a default module to match on some email
header (e.g. From, To, Subject, ...). It can set new email headers (e.g. X-OTRS-Ignore: yes or
X-OTRS-Queue: spam) if a filter rule matches. The jobs of the Example below can be inserted in
Kernel/Config.pm
Example 4.4. Example jobs for the filter module Kernel::System::PostMaster::Filter::Match
# Job Name: 1-Match
# (block/ignore all spam email with From: noreply@)
$Self->{'PostMaster::PreFilterModule'}->{'1-Match'} = {
    Module => 'Kernel::System::PostMaster::Filter::Match',
    Match => {
        From => 'noreply@',
    },
    Set => {
        'X-OTRS-Ignore' => 'yes',
    },
};
# Job Name: 2-Match
# (sort emails with From: sales@example.com and Subject: **ORDER**
# into queue 'Order')
$Self->{'PostMaster::PreFilterModule'}->{'2-Match'} = {
    Module => 'Kernel::System::PostMaster::Filter::Match',
    Match => {
        To => 'sales@example.com',
        Subject => '**ORDER**',
    },
    Set => {
        'X-OTRS-Queue' => 'Order',
    },
};
Kernel::System::PostMaster::Filter::CMD is a default module to pipe the email into an
external command. The output is given to STDOUT and if the result is true, then set new email header
(e.g. X-OTRS-Ignore: yes or X-OTRS-Queue: spam). The Example below can be used in
Kernel/Config.pm
Example 4.5. Example job for the filter module Kernel::System::PostMaster::Filter::CMD
# Job Name: 5-SpamAssassin
# (SpamAssassin example setup, ignore spam emails)
$Self->{'PostMaster::PreFilterModule'}->{'5-SpamAssassin'} = {
    Module => 'Kernel::System::PostMaster::Filter::CMD',
    CMD => '/usr/bin/spamassassin | grep -i "X-Spam-Status: yes"',
    Set => {
        'X-OTRS-Ignore' => 'yes',
    },
};
Kernel::System::PostMaster::Filter::ExternalTicketNumberRecognition is a default
module that adds the possibility to parse external identifiers, in the email subject, the body or both
using regular expressions. It then stores this value in a defined dynamic field. When an email comes in,
OTRS will first search for an external identifier and when it finds one, query OTRS on the pre-defined
dynamic field. If it finds an existing ticket, it will update this ticket, otherwise it will create a
new ticket with the external reference number in the separate field.
OTRS SysConfig already provide 4 different settings to setup different external ticket numbers. If more
settings are needed they need to be added manually. The following example can be used in
Kernel/Config.pm to extend SysConfig settings.
Example 4.6.
Example job for the filter module
Kernel::System::PostMaster::Filter::ExternalTicketNumberRecognition
# Job Name: ExternalTicketNumberRecognition
# External Ticket Number Reconition, check for Incident-<number> in incoming mails subject and
# body from the addeesses <sender>@externalticket.com, if number is found it will be stored in
# the dynamic field 'ExternalNumber' (that need to be setup in the Admin Panel).
$Self->{'PostMaster::PreFilterModule'}->{'000-ExternalTicketNumberRecognition'} = {
    'FromAddressRegExp' => '\\s*@externalticket.com',
    'NumberRegExp'      => 'Incident-(\\d.*)',
    'SearchInSubject'   => '1',
    'SearchInBody'      => '1',
    'TicketStateTypes'  => 'new;open'
    'DynamicFieldName'  => 'ExternalNumber',
    'Module'            => 'Kernel::System::PostMaster::Filter::ExternalTicketNumberRecognition',
    'Name'              => 'Test External Ticket Number',
    'SenderType'        => 'system',
};
Configuration Options
FromAddressRegExp
This is an optional setting. Only mails matching this From: address will be considered for this filter. You can adjust this setting to the sender address your external system uses for outgoing mails. In case this address can differ, you can set this option to empty. OTRS will in that case not check the sender address.
NumberRegExp
This is a mandatory setting. This setting contains the regular expression OTRS will use to extract the ticket number out of the subject and/or ticket body. The default regular expression will match occurrences of for example 'Incident-12354' and will put the part between parentheses in the dynamic field field, in this case '12354'.
SearchInSubject
If this is set to '1', the email subject is searched for a ticket number.
SearchInBody
If this is set to '1', the email body is searched for a ticket number.
TicketStateTypes
This is an optional setting. If given, it will search OTRS only for open external tickets of given state types. The state types are separated with semicolons.
DynamicField
This is a required setting. It defines the dynamic filed that is used to store the external number (the field name must exist in the system and has to be valid).
SenderType
This defines the sender type used for the articles created in OTRS.
Kernel::System::PostMaster::Filter::Decrypt is a default module that is capable to
decrypt an encrypted incoming email message (S/MIME or PGP) placing the unencrypted message body in the
email header X-OTRS-BodyDecrypted to be processed later. Additionally it can also update the email body
to the unencrypted version.
In order to decrypt the emails the system needs to be properly configured for S/MIME and/or PGP and have the needed private keys to decrypt the information.
This module is disabled by default and it can be configured directly in the System Configuration in the Admin Panel.
Configuration Options
StoreDecryptedBody
Set this option to "1" to update the email body to the unencrypted version if the decryption was successful. Be aware that using this the emails will be stored unencrypted and there is no possible way to revert this action.
Of course it's also possible to develop your own PostMaster filter modules.
This section shows some common issues and things to consider when troubleshooting Postmaster filters.
The filters are worked in order of their alphabetically sorted filter names. The last filter wins for a certain field to be set, when the criteria match twice.
Stop After Match can prevent a second match.
Make sure the regular expression is valid.
Headers can be set as to control OTRS, but are not written in the mail itself.
When matching one From, CC, TO, use EMAILADDRESS: <your@address>
The Mailbox must be trusted.
The match criteria are AND conditions.
Ticket properties can not be matched by the postmaster filter.
Note
Details about Postmaster filter processing are also present in communication logs. Make sure to check Communication Log in the Admin area.
OTRS has the capability to sign or encrypt outgoing messages with PGP. Furthermore, encrypted incoming messages can be decrypted. Encryption and decryption are done with the GPL tool GnuPG. To setup GnuPG for OTRS, the following steps have to be performed:
Install GnuPG, via the package manager of your operating system.
Configure GnuPG for use with OTRS. The necessary directories for GnuPG and a private key have to be created. The command shown in the script below has to be executed as user 'otrs' from a shell.
    linux:~# su otrs
    linux:/root$ cd
    linux:~$ pwd
    /opt/otrs
    linux:~$ gpg --gen-key
    gpg (GnuPG) 1.4.2; Copyright (C) 2005 Free Software Foundation, Inc.
    This program comes with ABSOLUTELY NO WARRANTY.
    This is free software, and you are welcome to redistribute it
    under certain conditions. See the file COPYING for details.

    gpg: directory `/opt/otrs/.gnupg' created
    gpg: new configuration file `/opt/otrs/.gnupg/gpg.conf' created
    gpg: WARNING: options in `/opt/otrs/.gnupg/gpg.conf' are not yet active during t
    his run
    gpg: keyring `/opt/otrs/.gnupg/secring.gpg' created
    gpg: keyring `/opt/otrs/.gnupg/pubring.gpg' created
    Please select what kind of key you want:
       (1) DSA and Elgamal (default)
       (2) DSA (sign only)
       (5) RSA (sign only)
    Your selection? 1
    DSA keypair will have 1024 bits.
    ELG-E keys may be between 1024 and 4096 bits long.
    What keysize do you want? (2048)
    Requested keysize is 2048 bits
    Please specify how long the key should be valid.
         0 = key does not expire
      <n>  = key expires in n days
      <n>w = key expires in n weeks
      <n>m = key expires in n months
      <n>y = key expires in n years
    Key is valid for? (0)
    Key does not expire at all
    Is this correct? (y/N) y

    You need a user ID to identify your key; the software constructs the user ID
    from the Real Name, Comment and Email Address in this form:
        "Heinrich Heine (Der Dichter) <heinrichh@duesseldorf.de>"

    Real name: Ticket System
    Email address: support@example.com
    Comment: Private PGP Key for the ticket system with address support@example.com
    You selected this USER-ID:
    "Ticket System (Private PGP Key for the ticket system with address support@examp
    le.com) <support@example.com>"

    Change (N)ame, (C)omment, (E)mail or (O)kay/(Q)uit? O
    You need a Passphrase to protect your secret key.

    Passphrase: secret
    Repeat passphrase: secret

    We need to generate a lot of random bytes. It is a good idea to perform
    some other action (type on the keyboard, move the mouse, utilize the
    disks) during the prime generation; this gives the random number
    generator a better chance to gain enough entropy.
    ++++++++++.+++++++++++++++++++++++++....+++++.+++++...+++++++++++++++++++++++++.
    +++++++++++++++++++++++++.+++++.+++++.+++++++++++++++++++++++++>++++++++++>+++++
    .......>+++++<+++++................................+++++

    Not enough random bytes available.  Please do some other work to give
    the OS a chance to collect more entropy! (Need 280 more bytes)

    ++++++++++.+++++..++++++++++..+++++....++++++++++++++++++++.+++++++++++++++.++++
    ++++++++++++++++++++++++++.++++++++++.+++++++++++++++.++++++++++.+++++++++++++++
    ..+++++>.+++++....>+++++........................................................
    ...........................................................>+++++<+++++.........
    .............+++++^^^
    gpg: /opt/otrs/.gnupg/trustdb.gpg: trustdb created
    gpg: key 7245A970 marked as ultimately trusted
    public and secret key created and signed.

    gpg: checking the trustdb
    gpg: 3 marginal(s) needed, 1 complete(s) needed, PGP trust model
    gpg: depth: 0  valid:   1  signed:   0  trust: 0-, 0q, 0n, 0m, 0f, 1u
    pub   1024D/7245A970 2006-02-03
          Key fingerprint = 2ED5 BC36 D2B6 B055 7EE1  5833 1D7B F967 7245 A970
     uid                  Ticket System (Private pgp key for ticket system with addre
    ss support@example.com) <support@example.com>
    sub   2048g/52B97069 2006-02-03

    linux:~$
Script: Configuring GnuPG.
As shown in the script below, the default settings can be applied for most of the required parameters. Only the values for the key owner have to be entered correctly, with a proper password specified for the key.
In the screen for the PGP settings, PGP should be activated for OTRS (first option). Also, the path to the gpg program should be set and checked.
The next config setting (PGP::Options) may also require changing. Via this config setting, the parameters that are used for every execution of gpg by the 'otrs' user can be specified. In particular, the directory of the config files for GnuPG of the 'otrs' user is important. In the example
/opt/otrs/.gnupgis used. This directory was created earlier during the PGP configuration.Via the next config option (PGP::Key::Password) it is possible to specify the pairs of key IDs and their passwords for own private keys. Because communication partners from outside write to the ticket system with their messages encrypted with your public key, OTRS can decrypt these messages with the ID/passwords specified here.
How to get the id of your own private key? The ID of your own private key is already shown during the key generation (see step 1 from above). It is also possible to get the ID if the command specified in the following script is executed as user 'otrs':
    linux:~# su otrs
    linux:/root$ cd
    linux:~$ pwd
    /opt/otrs
    linux:~$ gpg --list-keys
    /opt/otrs/.gnupg/pubring.gpg
    ----------------------------
    pub   1024D/7245A970 2006-02-03
    uid                  Ticket System (Private pgp key for ticket system with
    address support@example.com) <support@example.com>
    sub   2048g/52B97069 2006-02-03

    linux:~$
Script: Getting the ID of your own private key.
The ID of the private key can be found in the line that starts with "sub". It is a hexadecimal string that is eight characters long, in the example above it is "52B97069". The password you have to specify for this key in the ticket system is the same that was given during key generation.
After this data is inserted, the "Update" button can be used to save the settings. OTRS is ready to receive and decrypt encoded messages now.
Finally, import a customer's public key. This ensures that encrypted messages can be sent out to this customer. There are two ways to import a public key of a customer.
The first way is to specify the public key of a customer in the customer management interface.
The second way is to specify the key via the PGP settings, reachable from the Admin page. On the right section of this screen, all already imported public keys of customers are displayed. After PGP has been activated and configured for OTRS, your own public key should also be listed there. In the left area of the PGP setting screen it is possible to search for keys. Also, a new public key can be uploaded into the system from a file.
The files with the public key that need to be imported into OTRS have to be GnuPGP compatible key files. In most cases, the key stored in a file is an "ASCII armored key". OTRS can deal with this format.
At first glance, encryption with S/MIME seems a little more complicated than with PGP. First, you have to establish a Certification Authority (CA) for the OTRS system. The subsequent steps are very much like those needed with PGP: configure OTRS, install your own certificate, import other public certificates as needed, etc.
The S/MIME configuration is conducted outside the OTRS web interface for the most part, and should be carried out in a shell by the 'otrs' user. The MIME configuration under Linux is based on SSL (OpenSSL). Therefore, check first of all whether the OpenSSL package is installed on your system. The OpenSSL package includes a script called CA.pl, with which the most important steps of certificate creation can be performed. To simplify the procedure, find out where in the filesystem the CA.pl script is stored and enter the location temporarily into the PATH variable of the shell (see Script below).
otrs@linux:~> rpm -ql openssl | grep CA
/usr/share/ssl/misc/CA.pl
otrs@linux:~> export PATH=$PATH:/usr/share/ssl/misc
otrs@linux:~> which CA.pl
/usr/share/ssl/misc/CA.pl
otrs@linux:~> mkdir tmp; cd tmp
otrs@linux:~/tmp>
Script: Configuring S/MIME.
The script above shows that a new temporary directory ~/tmp has been created, in which the certificate is to be generated.
To create a certificate, perform the following operations in the command line (we assume that the OTRS administrator has to create a SSL certificate for test and learning purposes. In case you already have a certified SSL certificate for the encryption, use it and skip these steps):
Establish your own Certification Authority for SSL. You need it to certify the request for your own SSL certificate (see Script below).
otrs@linux:~/tmp> CA.pl -newca
CA certificate filename (or enter to create)

Making CA certificate ...
Generating a 1024 bit RSA private key
...++++++
......++++++
writing new private key to './demoCA/private/cakey.pem'
Enter PEM pass phrase:
Verifying - Enter PEM pass phrase:
-----
You are about to be asked to enter information that will be incorporated
into your certificate request.
What you are about to enter is what is called a Distinguished Name or a DN.
There are quite a few fields but you can leave some blank
For some fields there will be a default value,
If you enter '.', the field will be left blank.
-----
Country Name (2 letter code) [AU]:DE
State or Province Name (full name) [Some-State]:OTRS-state
Locality Name (eg, city) []:OTRS-town
Organization Name (eg, company) [Internet Widgits Pty Ltd]:Your company
Organizational Unit Name (eg, section) []:
Common Name (eg, YOUR name) []:OTRS Admin
Email Address []:otrs@your-domain.tld
otrs@linux:~/tmp> ls -la demoCA/
total 8
-rw-r--r--  1 otrs otrs 1330 2006-01-08 17:54 cacert.pem
drwxr-xr-x  2 otrs otrs   48 2006-01-08 17:53 certs
drwxr-xr-x  2 otrs otrs   48 2006-01-08 17:53 crl
-rw-r--r--  1 otrs otrs    0 2006-01-08 17:53 index.txt
drwxr-xr-x  2 otrs otrs   48 2006-01-08 17:53 newcerts
drwxr-xr-x  2 otrs otrs   80 2006-01-08 17:54 private
-rw-r--r--  1 otrs otrs   17 2006-01-08 17:54 serial
otrs@linux:~/tmp>
Script: Establishing a Certification Authority for SSL.
Generate a certificate request (see Script below).
otrs@linux:~/tmp> CA.pl -newreq
Generating a 1024 bit RSA private key
..........................................++++++
....++++++
writing new private key to 'newreq.pem'
Enter PEM pass phrase:
Verifying - Enter PEM pass phrase:
-----
You are about to be asked to enter information that will be incorporated
into your certificate request.
What you are about to enter is what is called a Distinguished Name or a DN.
There are quite a few fields but you can leave some blank
For some fields there will be a default value,
If you enter '.', the field will be left blank.
-----
Country Name (2 letter code) [AU]:DE\keyreturn
State or Province Name (full name) [Some-State]:OTRS-state
Locality Name (eg, city) []:OTRS-town
Organization Name (eg, company) [Internet Widgits Pty Ltd]:Your company
Organizational Unit Name (eg, section) []:
Common Name (eg, YOUR name) []:OTRS admin
Email Address []:otrs@your-domain.tld

Please enter the following 'extra' attributes
to be sent with your certificate request
A challenge password []:
An optional company name []:
Request (and private key) is in newreq.pem
otrs@linux:~/tmp> ls -la
total 4
drwxr-xr-x  6 otrs otrs  232 2006-01-08 17:54 demoCA
-rw-r--r--  1 otrs otrs 1708 2006-01-08 18:04 newreq.pem
otrs@linux:~/tmp>
Script: Creating a certificate request.
Signing of the certificate request. The certificate request can either be signed and thereby certified by your own CA, or made more credible by being signed by another external certified CA (see Script below).
otrs@linux:~/tmp> CA.pl -signreq
Using configuration from /etc/ssl/openssl.cnf
Enter pass phrase for ./demoCA/private/cakey.pem:
Check that the request matches the signature
Signature ok
Certificate Details:
        Serial Number:
            fd:85:f6:9f:14:07:16:c8
        Validity
            Not Before: Jan  8 17:04:37 2006 GMT
            Not After : Jan  8 17:04:37 2007 GMT
        Subject:
            countryName               = DE
            stateOrProvinceName       = OTRS-state
            localityName              = OTRS-town
            organizationName          = Your Company
            commonName                = OTRS administrator
            emailAddress              = otrs@your-domain.tld
        X509v3 extensions:
            X509v3 Basic Constraints:
                CA:FALSE
            Netscape Comment:
                OpenSSL Generated Certificate
            X509v3 Subject Key Identifier:
                01:D9:1E:58:C0:6D:BF:27:ED:37:34:14:D6:04:AC:C4:64:98:7A:22
            X509v3 Authority Key Identifier:
                keyid:10:4D:8D:4C:93:FD:2C:AA:9A:B3:26:80:6B:F5:D5:31:E2:8E:DB:A8
                DirName:/C=DE/ST=OTRS-state/L=OTRS-town/O=Your Company/
                CN=OTRS admin/emailAddress=otrs@your-domain.tld
                serial:FD:85:F6:9F:14:07:16:C7

Certificate is to be certified until Jan  8 17:04:37 2007 GMT (365 days)
Sign the certificate? [y/n]:y

1 out of 1 certificate requests certified, commit? [y/n]y
Write out database with 1 new entries
Data Base Updated
Signed certificate is in newcert.pem
otrs@linux:~/tmp>
Script: Signing of the certificate request.
Generate your own certificate, and all data going with it, using the signed certificate request (see Script below).
otrs@linux:~/tmp> CA.pl -pkcs12 "OTRS Certificate"
Enter pass phrase for newreq.pem:
Enter Export Password:
Verifying - Enter Export Password:
otrs@linux:~/tmp> ls -la
total 12
drwxr-xr-x  6 otrs otrs  328 2006-01-08 18:04 demoCA
-rw-r--r--  1 otrs otrs 3090 2006-01-08 18:13 newcert.p12
-rw-r--r--  1 otrs otrs 3791 2006-01-08 18:04 newcert.pem
-rw-r--r--  1 otrs otrs 1708 2006-01-08 18:04 newreq.pem
otrs@linux:~/tmp>
Script: Generating a new certificate.
Now that these operations have been performed, the S/MIME setup must be completed in OTRS.
This part of the setup is carried out in the Admin page, choosing the link "SMIME". In case the general S/MIME support in OTRS has not yet been enabled, the mask points this out to the administrator and provides an appropriate link for enabling it.
With the SysConfig group "Crypt::SMIME", you can also enable and configure the general S/MIME support.
Here you can activate S/MIME support, and define the paths for the OpenSSL command and the directory for the certificates. The key file created above must be stored in the directory indicated here. Otherwise OpenSSL cannot use it.
The next step is performed in the S/MIME configuration on the OTRS Admin page. Here, you can import the private key(s) of the OTRS system and the public keys of other communication partners. Enter the public key that has been created in the beginning of this section and added to OTRS.
Obviously, all public S/MIME keys of communication partners can be imported using the customer user administration tool as well.
It is possible to use a Customer User Backed (such as LDAP) as the source of public S/MIME certificates. This certificates could be imported into the system and be displayed in S/MIME configuration on the OTRS Admin page and they can be used from OTRS to send encrypted emails to the customers.
In order to enable this feature is needed to:
Enable
SMIMEin SysConfigEnable
SMIME::FetchFromCustomerin SysConfigConfigure a customer user backend to provide the attribute
UserSMIMECertificatewith the customer user S/MIME certificate (there is an example for LDAP customer user mapping in$OTRS_HOME/Kernel/Config/Defaults.pm).
This feature can be used in three different ways:
Incoming Emails:
A dedicated Postmaster filter (
PostMaster::PreFilterModule###000-SMIMEFetchFromCustomerin SysConfig) will extract the email address of each incoming email and will try to find the email address is the list of customers. If found it will try get the S/MIME certificate from customer user attributes. If a certificate is found it will try to import it (unless it was already imported).Specific email address or all customers:
The console command
Maint::SMIME::CustomerCertificate::Fetchcan be used to import the S/MIME certificate of one customer email address as:shell> perl /opt/otrs/bin/otrs.Console.pl Maint::SMIME::CustomerCertificate::Fetch --email customer@example.comIn this case the console command will try to match the supplied email address with one of the customer users. If found it will try add to the system the S/MIME certificate found in customer user properties (if the certificate is not already added).
The same console command can be used to import the S/MIME certificates of all customer users (limited to
CustomerUserSearchListLimitproperty from the customer user backend). This option is discouraged specially for systems with a large number of customer users as it might require too much time to execute and depending on the limit it might be possible that not all customer certificates will be fetch. Execute the console command in this mode as:shell> perl /opt/otrs/bin/otrs.Console.pl Maint::SMIME::CustomerCertificate::Fetch --add-allFor this option the console command will query the customer user backends to get all possible customers and for each it will check if there is a S/MIME certificate. If a certificate is found, it will try to add it to the system (if the certificate is not already added).
Renew existing certificates:
Another console command
Maint::SMIME::CustomerCertificate::Renewcan be used to check for all existing certificates in the system. This verifies that the existing certificates from customer users matches the ones that are retrieved by the customer user properties. Any new certificate in the customer user backend will be added into the system (no certificates are deleted in this process).This console command is executed once a day by the OTRS daemon automatically with the task
Daemon::SchedulerCronTaskManager::Task###RenewCustomerSMIMECertificates(as seen in SysConfig), but it can be also executed manually on demand as:shell> perl /opt/otrs/bin/otrs.Console.pl Maint::SMIME::CustomerCertificate::Renew