- Introduction
- Configuration
- Adding a Dynamic Field
- Text Dynamic Field Configuration
- Textarea Dynamic Field Configuration
- Checkbox Dynamic Field Configuration
- Dropdown Dynamic Field Configuration
- Multiselect Dynamic Field Configuration
- Date Dynamic Field Configuration
- Date / Time Dynamic Field Configuration
- Editing a Dynamic Field
- Showing a Dynamic Field on a Screen
- Setting a Default Value by a Ticket Event Module
- Set a Default Value by User Preferences
A dynamic field is a special kind of field in OTRS, created to extend the information stored on a ticket or article. These fields are not fixed in the system and they can appear only in specific screens, they can be mandatory or not, and their representation in the screens depends on the field type defined at their creation time according to the data to be held by the field. For example, there are fields to hold a text, a date, a selection of items, etc.
Dynamic fields are the evolution of TicketFreeText, TicketFreeKey, TicketFreeTime, ArticleFreeText and ArticleFreeKey fields that where commonly used in OTRS 3.0 and before. The limitation of these "Free Fields" was that they can be defined up to 16 (text or dropdown) fields and 6 time fields for a ticket and 3 (text or dropdown) fields for each article only, not more.
Now with dynamic fields the limitation in the number of fields per ticket or article is removed, you can create as many dynamic fields you like either for ticket or articles. And beyond that, the framework behind the dynamic fields is prepared to handle custom fields for other objects rather than just ticket and articles.
This new framework that handles the dynamic fields is build using a modular approach, where each kind of dynamic field can be seen as a plug-in module for the framework. This means that the variety of dynamic fields can be easily extended by public OTRS modules, OTRS Feature Add-ons, OTRS custom developments, and other custom developments.
The following dynamic field types are included with this release:
Text (one line of text)
Textarea (multiple lines of text)
Checkbox
Dropdown (single choice, multiple values)
Multiselect (multiple choice, multiple values)
Date
Date / Time
By default, a clean installation of OTRS comes with two pre-installed internal dynamic fields, which cannot be removed. If you plan to use such fields in tickets, articles, customer users or customer companies you need to create new, custom dynamic fields.
Please note that dynamic fields for customer users and companies need to be configured accordingly in the
CustomerUser and CustomerCompany mapping, usually to find in Kernel/Config.pm of your OTRS installation.
Examples for configuring them can be found in Kernel/Config/Defaults.pm.
The configuration of a dynamic field is split in two parts, to add a new dynamic field or manage an existing one you need to navigate into the "Admin" panel in the "Dynamic Fields" link. To show, show as mandatory or hide a dynamic field in one screen you need to change the OTRS settings in the "SysConfig" screen.
Click on the "Admin" button located in the navigation bar, then click on the "Dynamic Fields" link inside "Ticket Settings" box located in the lower center of the screen. The dynamic fields overview will display as follows:

Notice that this screen will change as you add more dynamic fields to list all created dynamic fields. This screen might already have some fields if the installation was updated from an older version of OTRS.
The Actions in the side bar at the left of the screen describes four possibilities: Article, Ticket, CustomerUser and CustomerCompany, each one has its own dropdown selection of dynamic fields.
Note
The installation of an OTRS package could add more objects to the Action side bar.
The general procedure to create a dynamic field is:
Click on the desired dynamic field object dropdown in the Actions side bar.
Click on the dynamic field type that you want to add from the list.
Fill the configuration.
Save.
The configuration dialogs for the dynamic fields are split in two parts, the upper section is common among all the fields and the lower part might be different from one type of dynamic field to another.
General dynamic field settings:
Name: Mandatory, unique, only letters and numbers are allowed.
This is the internal name of the field, used for example to show or hide a field in one screen. Any modification of a field name (not recommended) requires a manual update of the "SysConfig" settings where the field is referenciated.
Label: Mandatory.
This is the field name to be displayed on the screens, it supports translations.
Note
Label translations have to be added manually to language translations files.
Field order: Mandatory.
Defines the relative order in which the field will be displayed on the screen, by default each new field has the last position, a change in this setting will affect the order of the other created dynamic fields.
Validity: Mandatory.
An invalid dynamic field will not be displayed in any screen, no matter if is configured to displayed.
Field type: Mandatory, Read only.
Shows the current selected field type.
Object type: Mandatory, Read only.
Shows the scope of field.
Note
To illustrate each specific field type settings a few fields will be added in our example. These new fields will be referenciated in later sections.
For the following examples all the dynamic fields will be created for the Ticket object. If you need to create a dynamic field for Article object, just choose the field from the Article dropdown list.
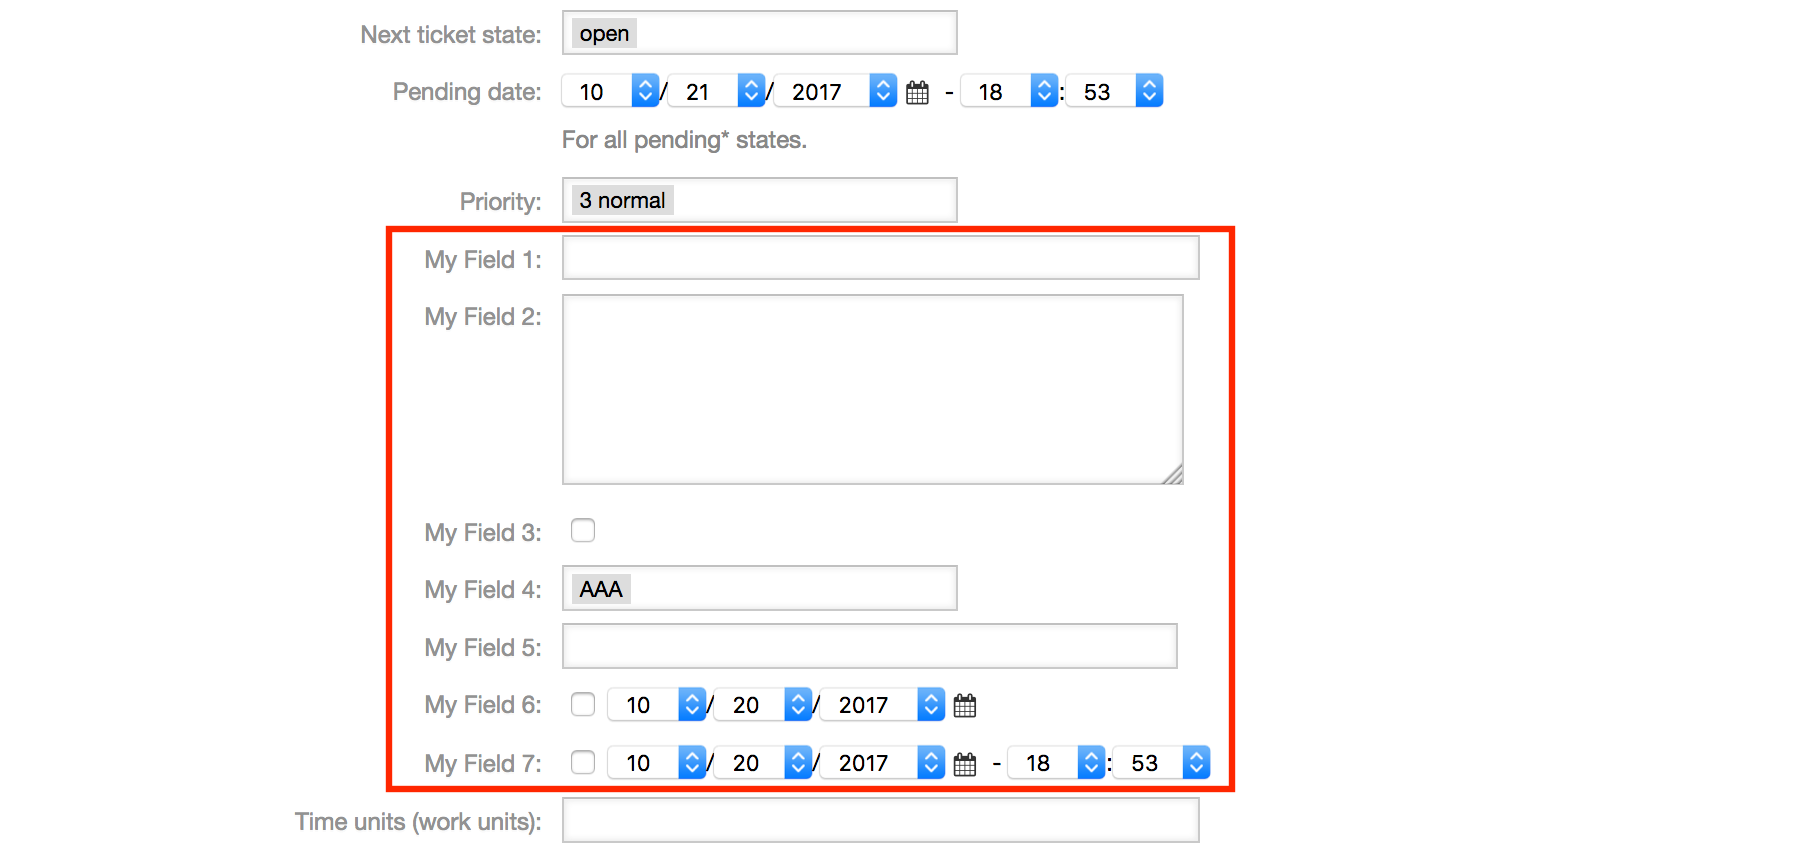
Table 4.6. The following fields will be added into the system:
| Name | Label | Type |
| Field1 | My Field 1 | Text |
| Field2 | My Field 2 | Textarea |
| Field3 | My Field 3 | Checkbox |
| Field4 | My Field 4 | Dropdown |
| Field5 | My Field 5 | Multiselect |
| Field6 | My Field 6 | Date |
| Field7 | My Field 7 | Date / Time |
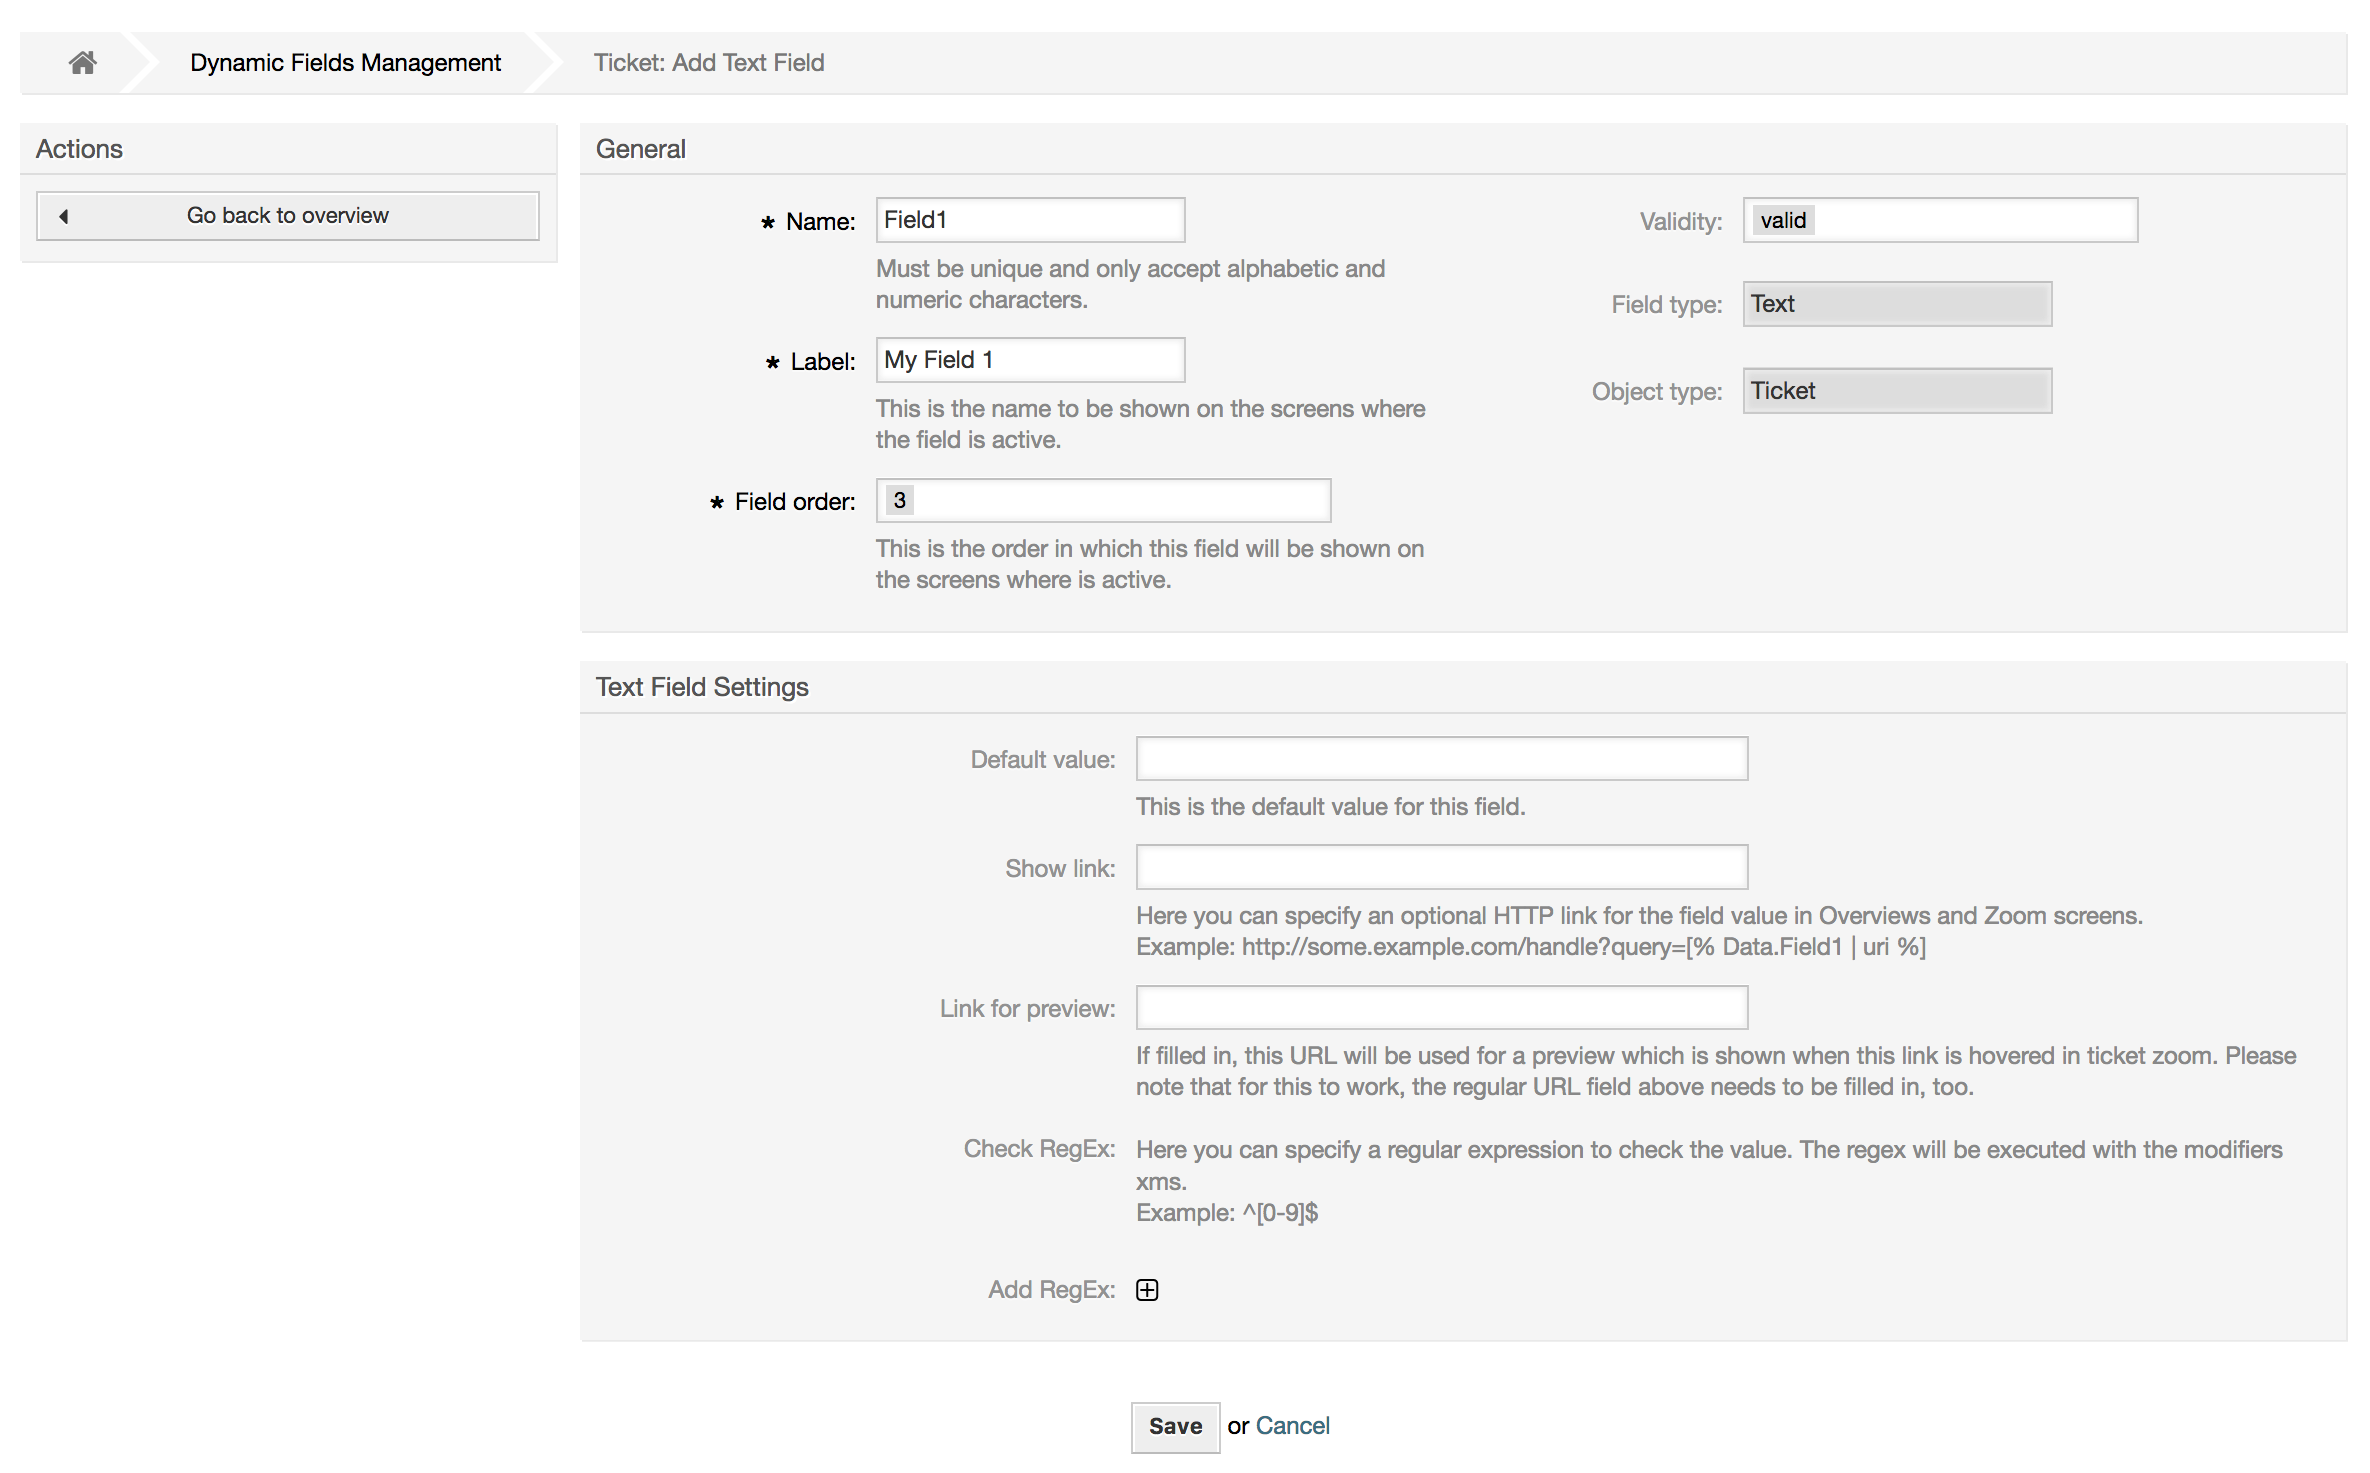
Text dynamic field is used to store a single line string.
Text dynamic field settings:
Default value: Optional.
This is the value to be shown by default on the edit screens (like New Phone Ticket or Ticket Compose).
Show link: Optional.
If set, the field value will be converted into a clickable link for display screens (like ticket zoom or overviews).
For example, if "Show link" is set to "http://www.otrs.com", clicking on the filled value will make your browser to open the OTRS web page.
Note
The use of [% Data.NameX | uri %] in the Set link value, where NameX is the name of the field, will add the field value as part of the link reference.
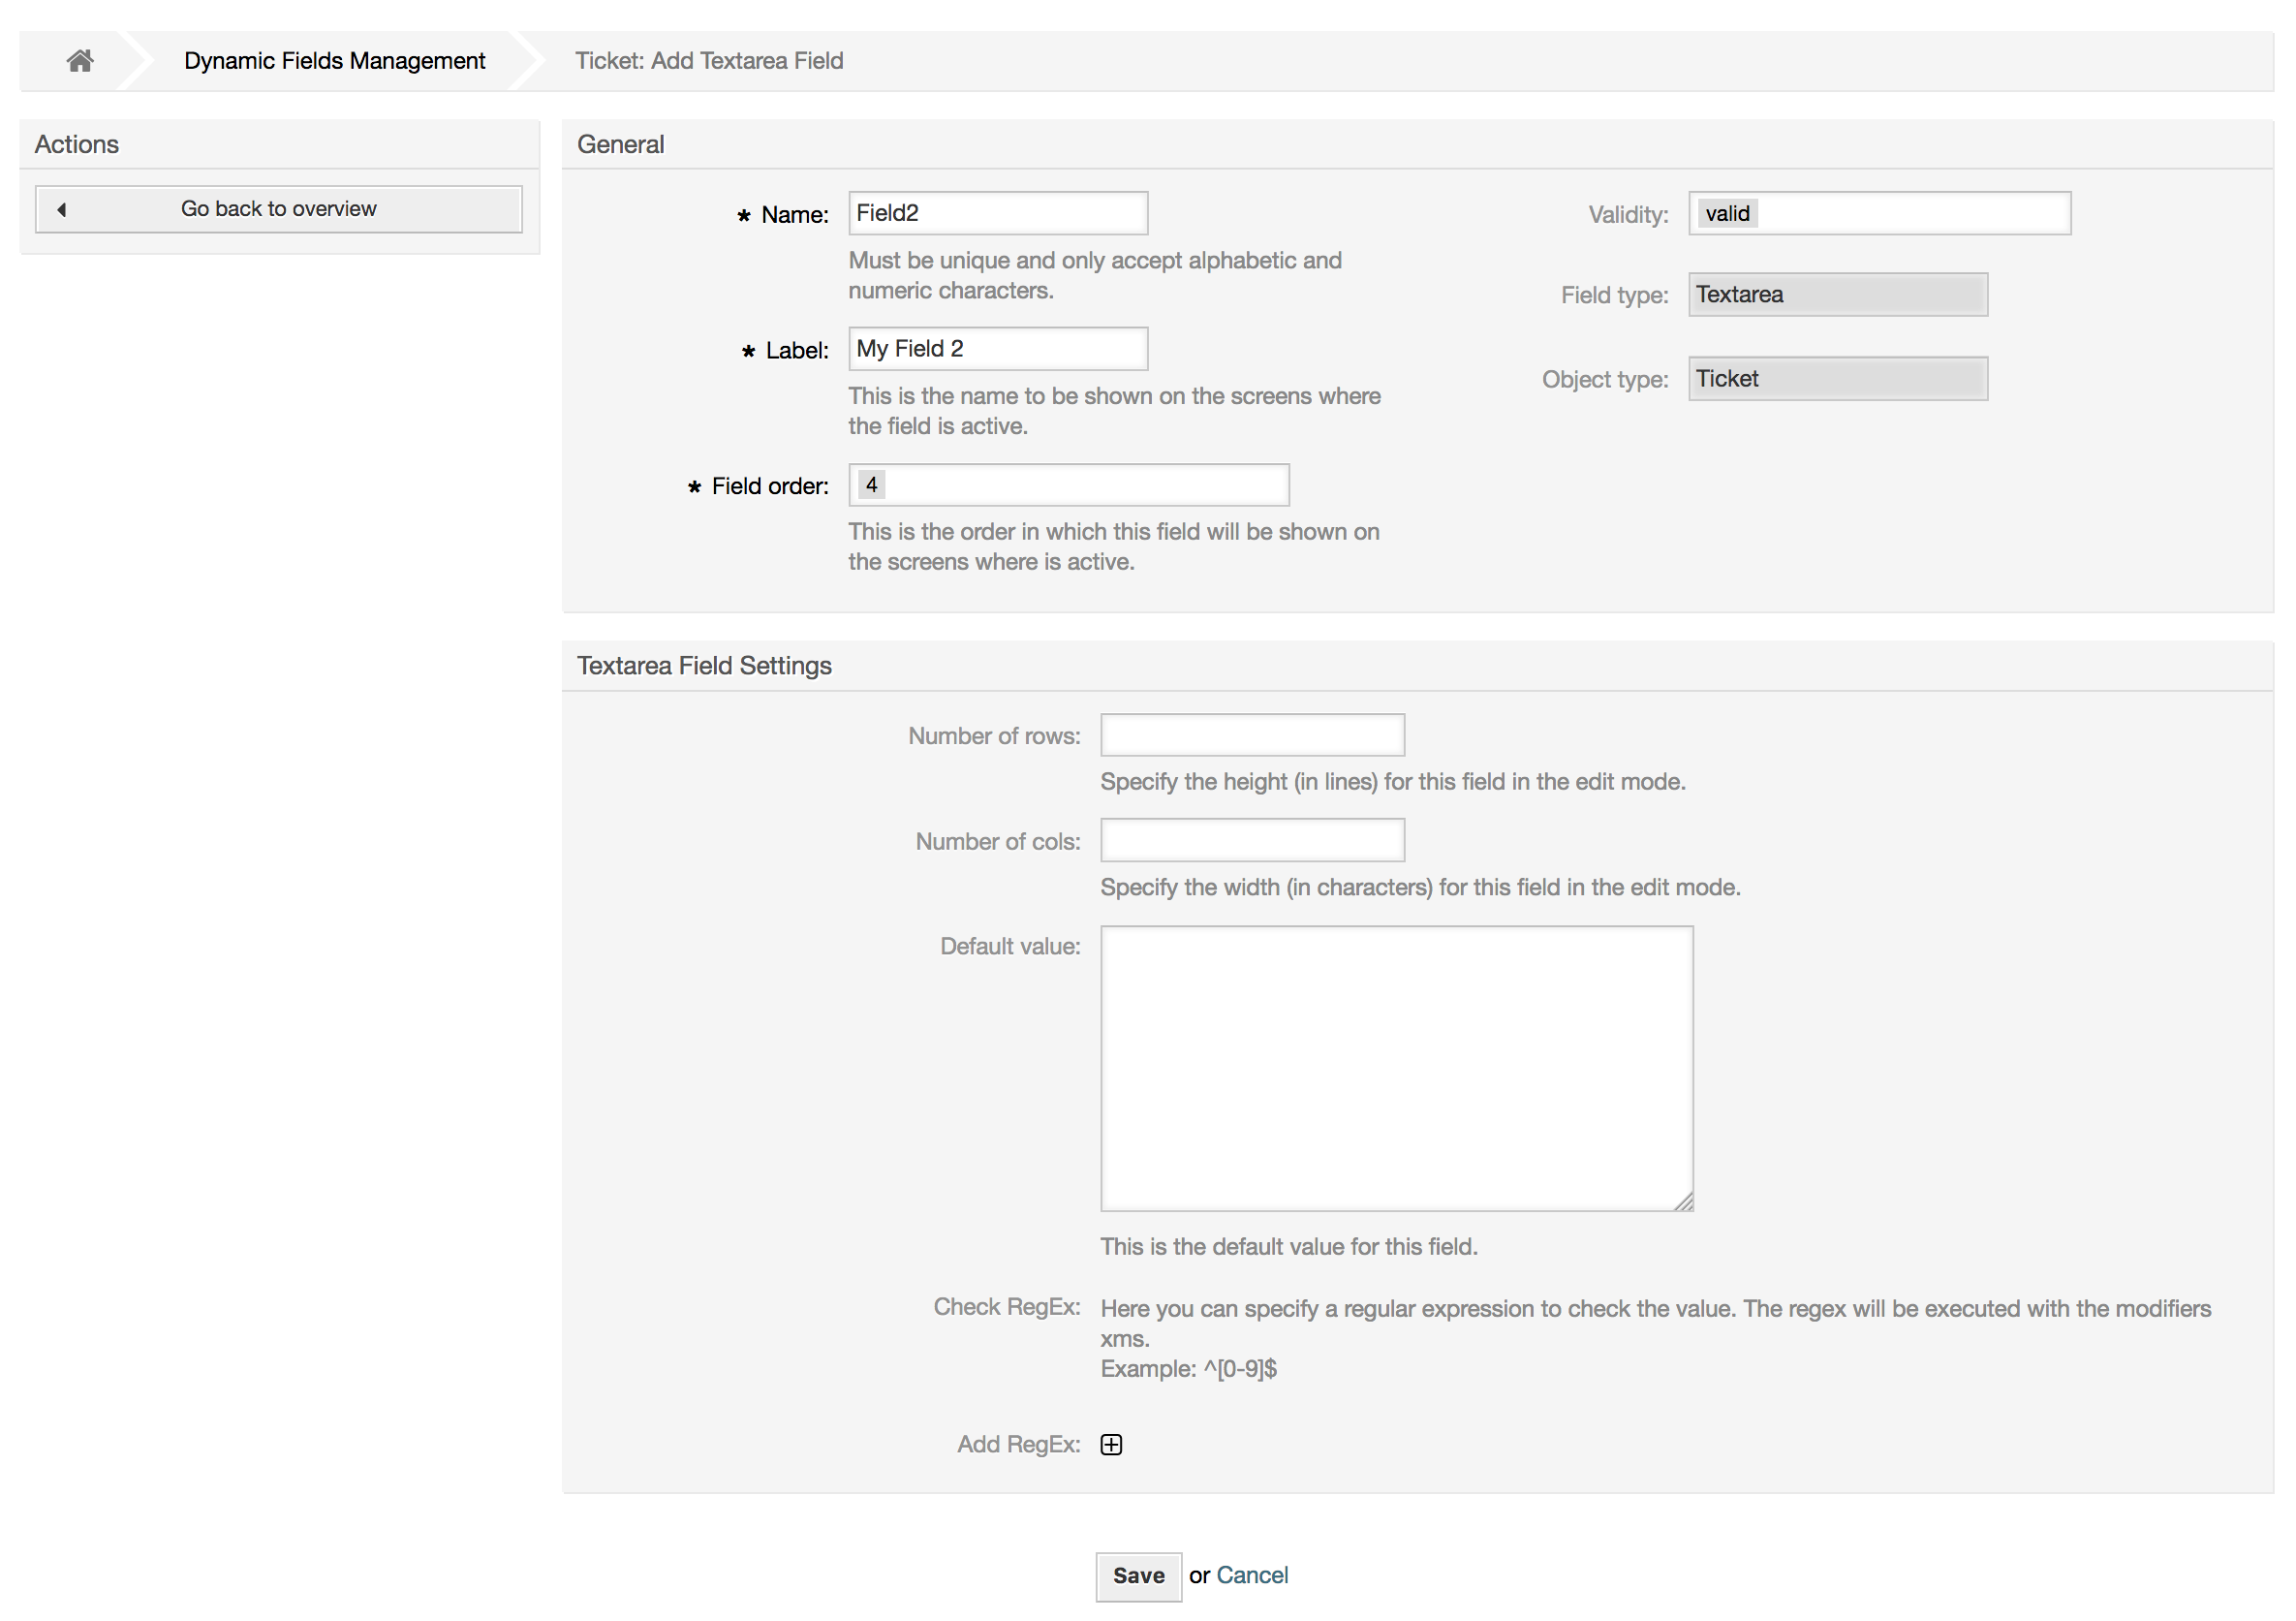
Textarea dynamic field is used to store a multiple line string.
Textarea dynamic field settings:
Number of rows: Optional, integer.
Used to define the height of the field in the edit screens (like New Phone Ticket or Ticket Compose).
Number of cols: Optional, Integer.
This value is used to define the width of the field in the edit screens.
Default value: Optional.
This is the value to be shown by default in the edit screens (it can be a multiple line text).
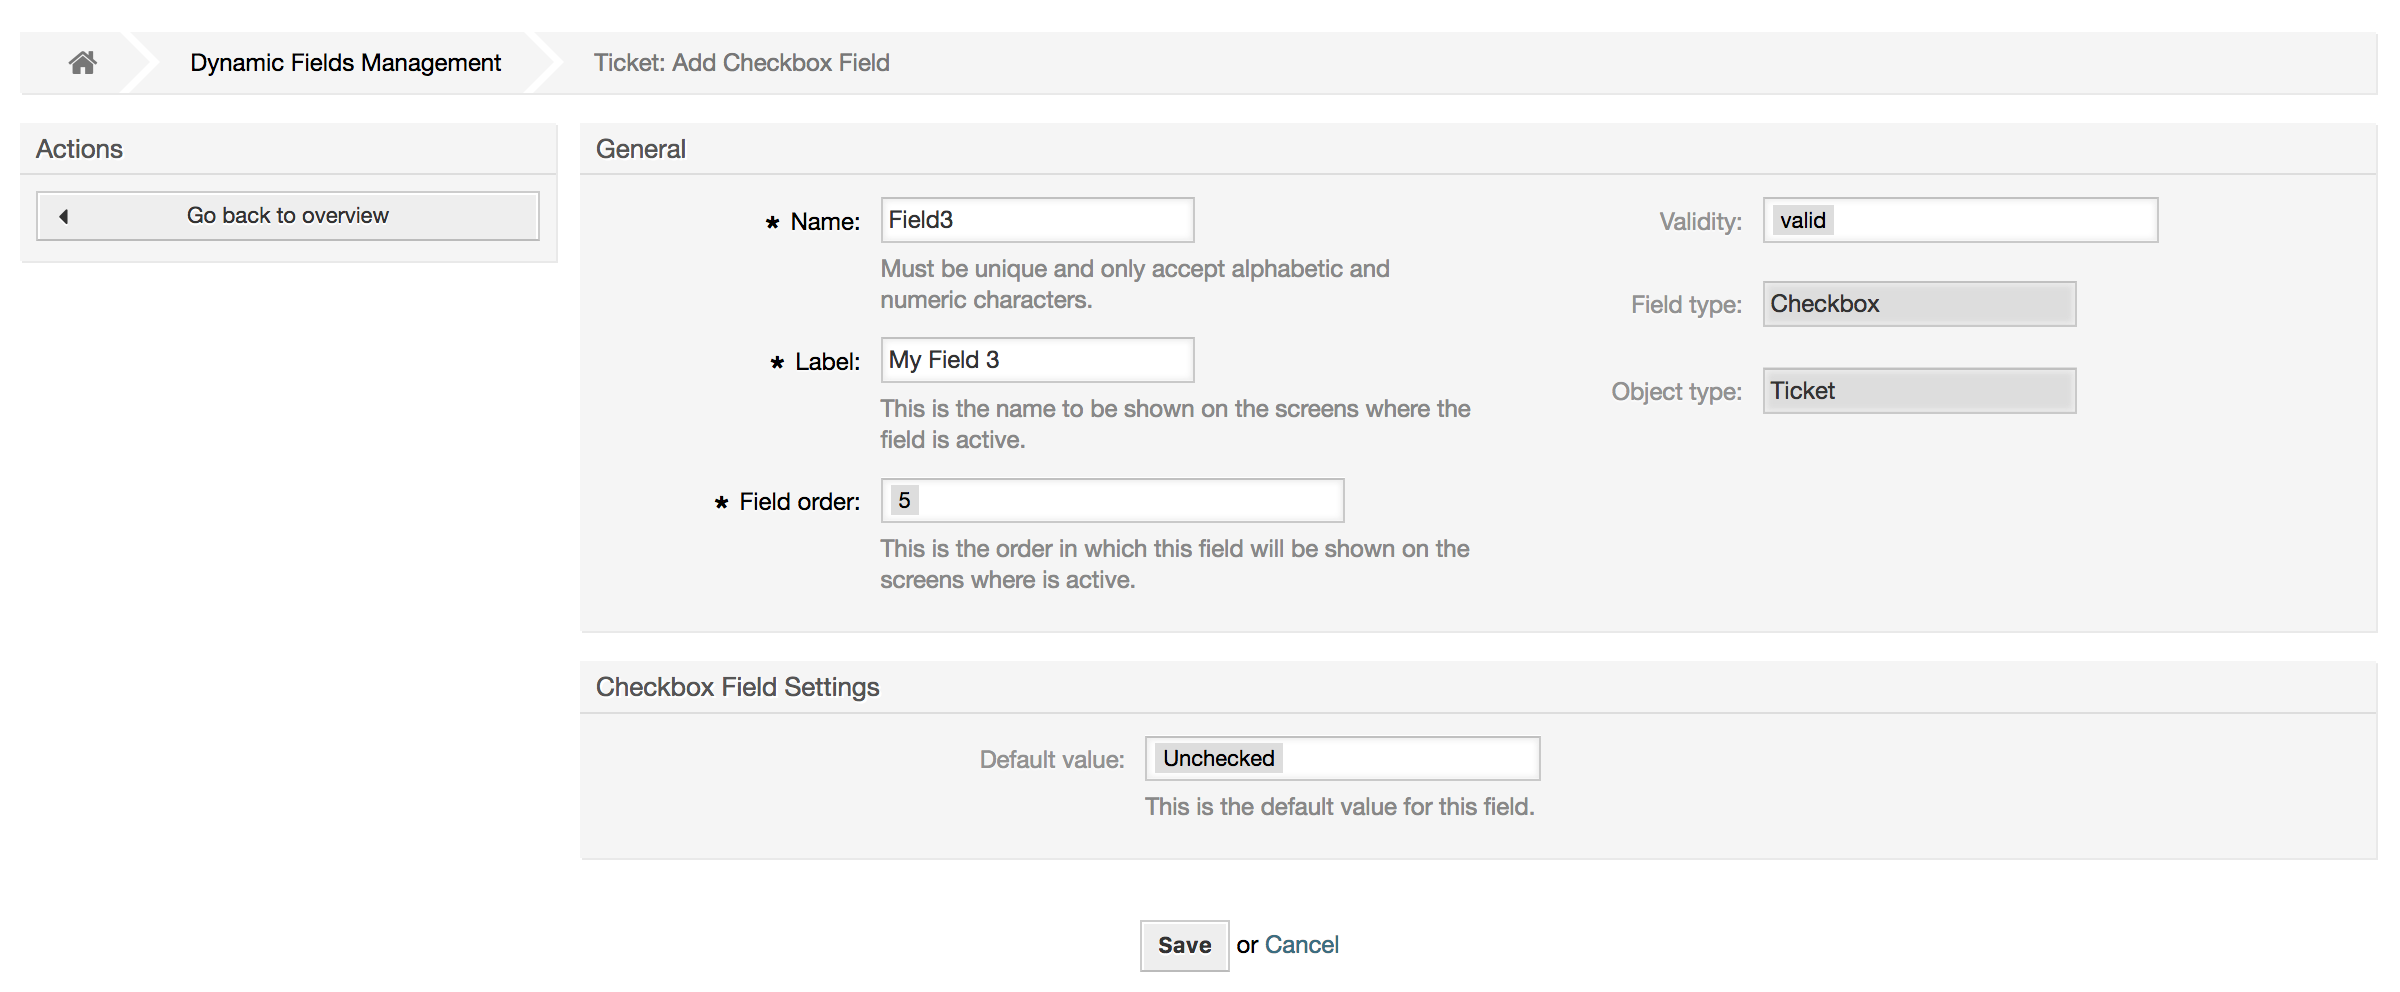
Checkbox dynamic field is used to store true or false value, represented by a checked or unchecked check box.
Checkbox dynamic field settings:
Default value: Mandatory.
This is the value to be shown by default on the edit screens (like New Phone Ticket or Ticket Compose), the default value for this field is closed selection which can be Checked or Unchecked.
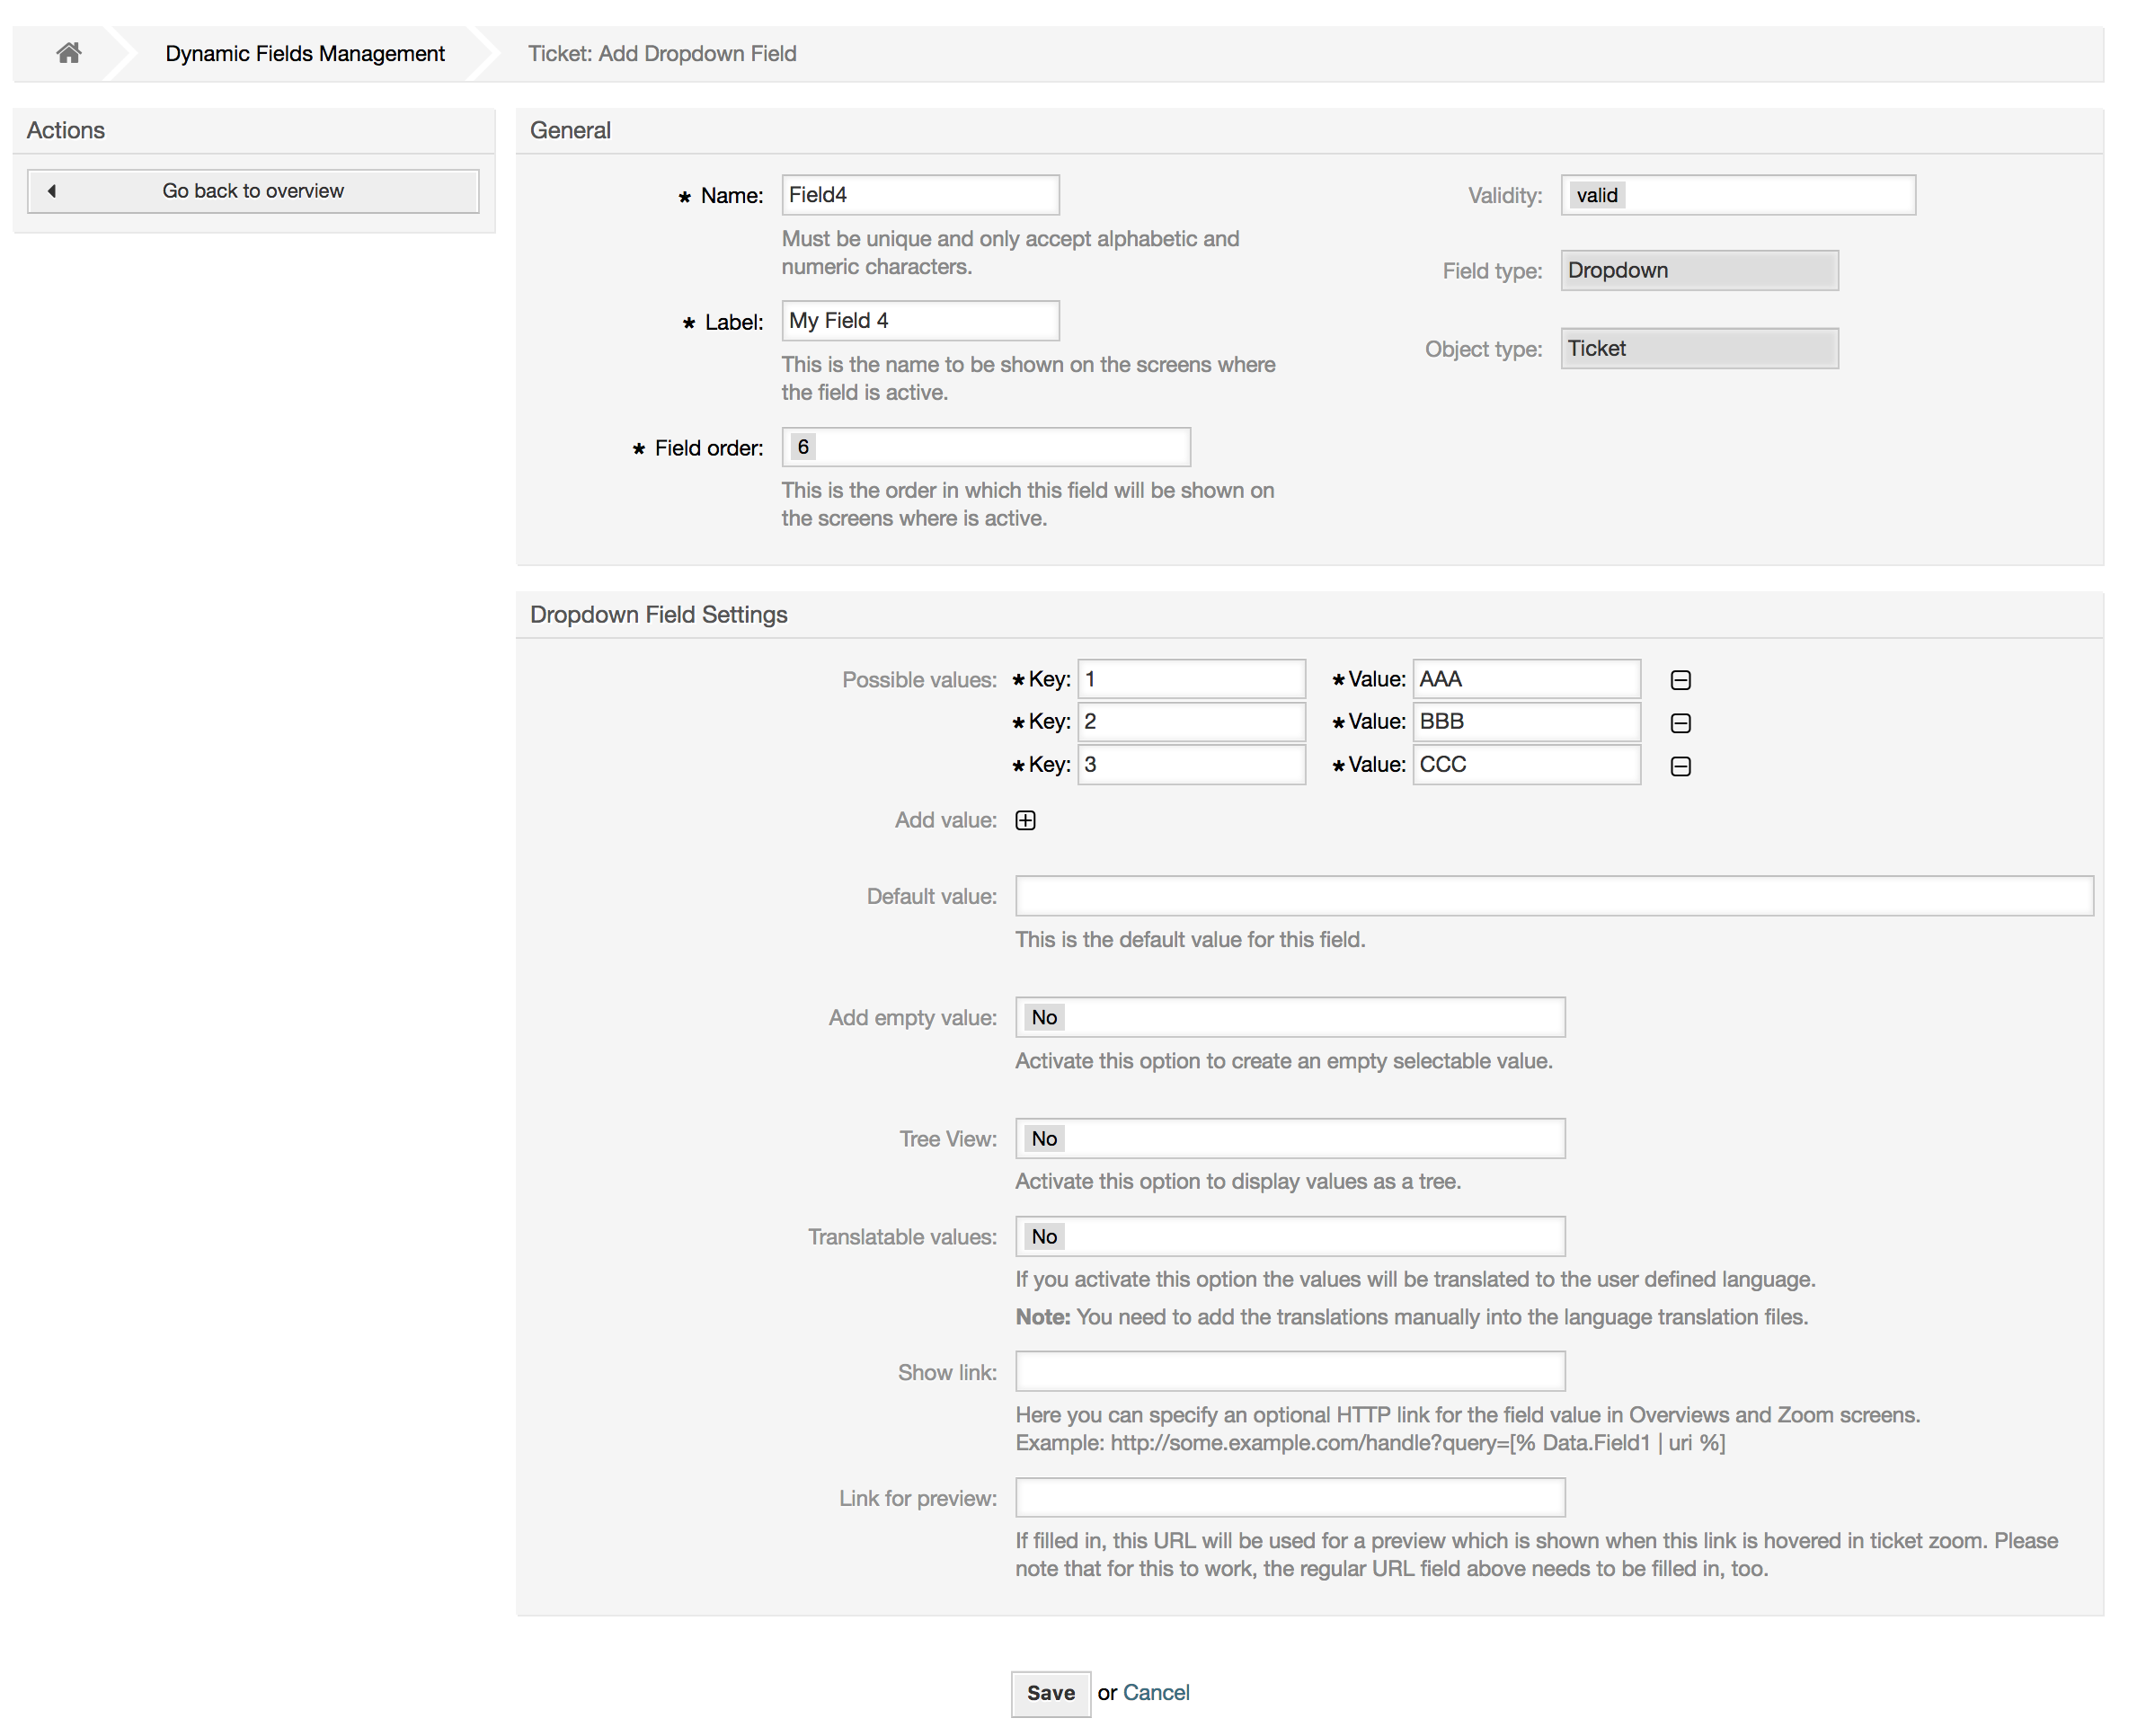
Dropdown dynamic field is used to store a single value, from a closed list.
Dropdown dynamic field settings:
Possible values: Mandatory.
List of values to choose. If used, a new value is necessary to specify the Key (internal value) and the Value (display value).
Default value: Optional.
This is the value to be shown by default on the edit screens (like New Phone Ticket or Ticket Compose), the default value for this field is closed selection as defined by the Possible values.
Add empty value: Mandatory, (Yes / No).
If this option is activated an extra value is defined to show as a "-" in the list of possible values. This special value is empty internally.
Translatable values: Mandatory, (Yes / No).
This setting is used mark the possible values of this field to be translated. Only the display values are translated, internal values are not affected, the translation of the values needs to be manually added to the language files.
Show link: Optional.
If set, the field value will be converted into a clickable link for display screens (like ticket zoom or overviews).
For example, if "Show link" is set to "http://www.otrs.com", clicking on the filled value will make your browser to open the OTRS web page.
Note
The use of [% Data.NameX | uri %] in the Set link value, where NameX is the name of the field, will add the field value as part of the link reference.
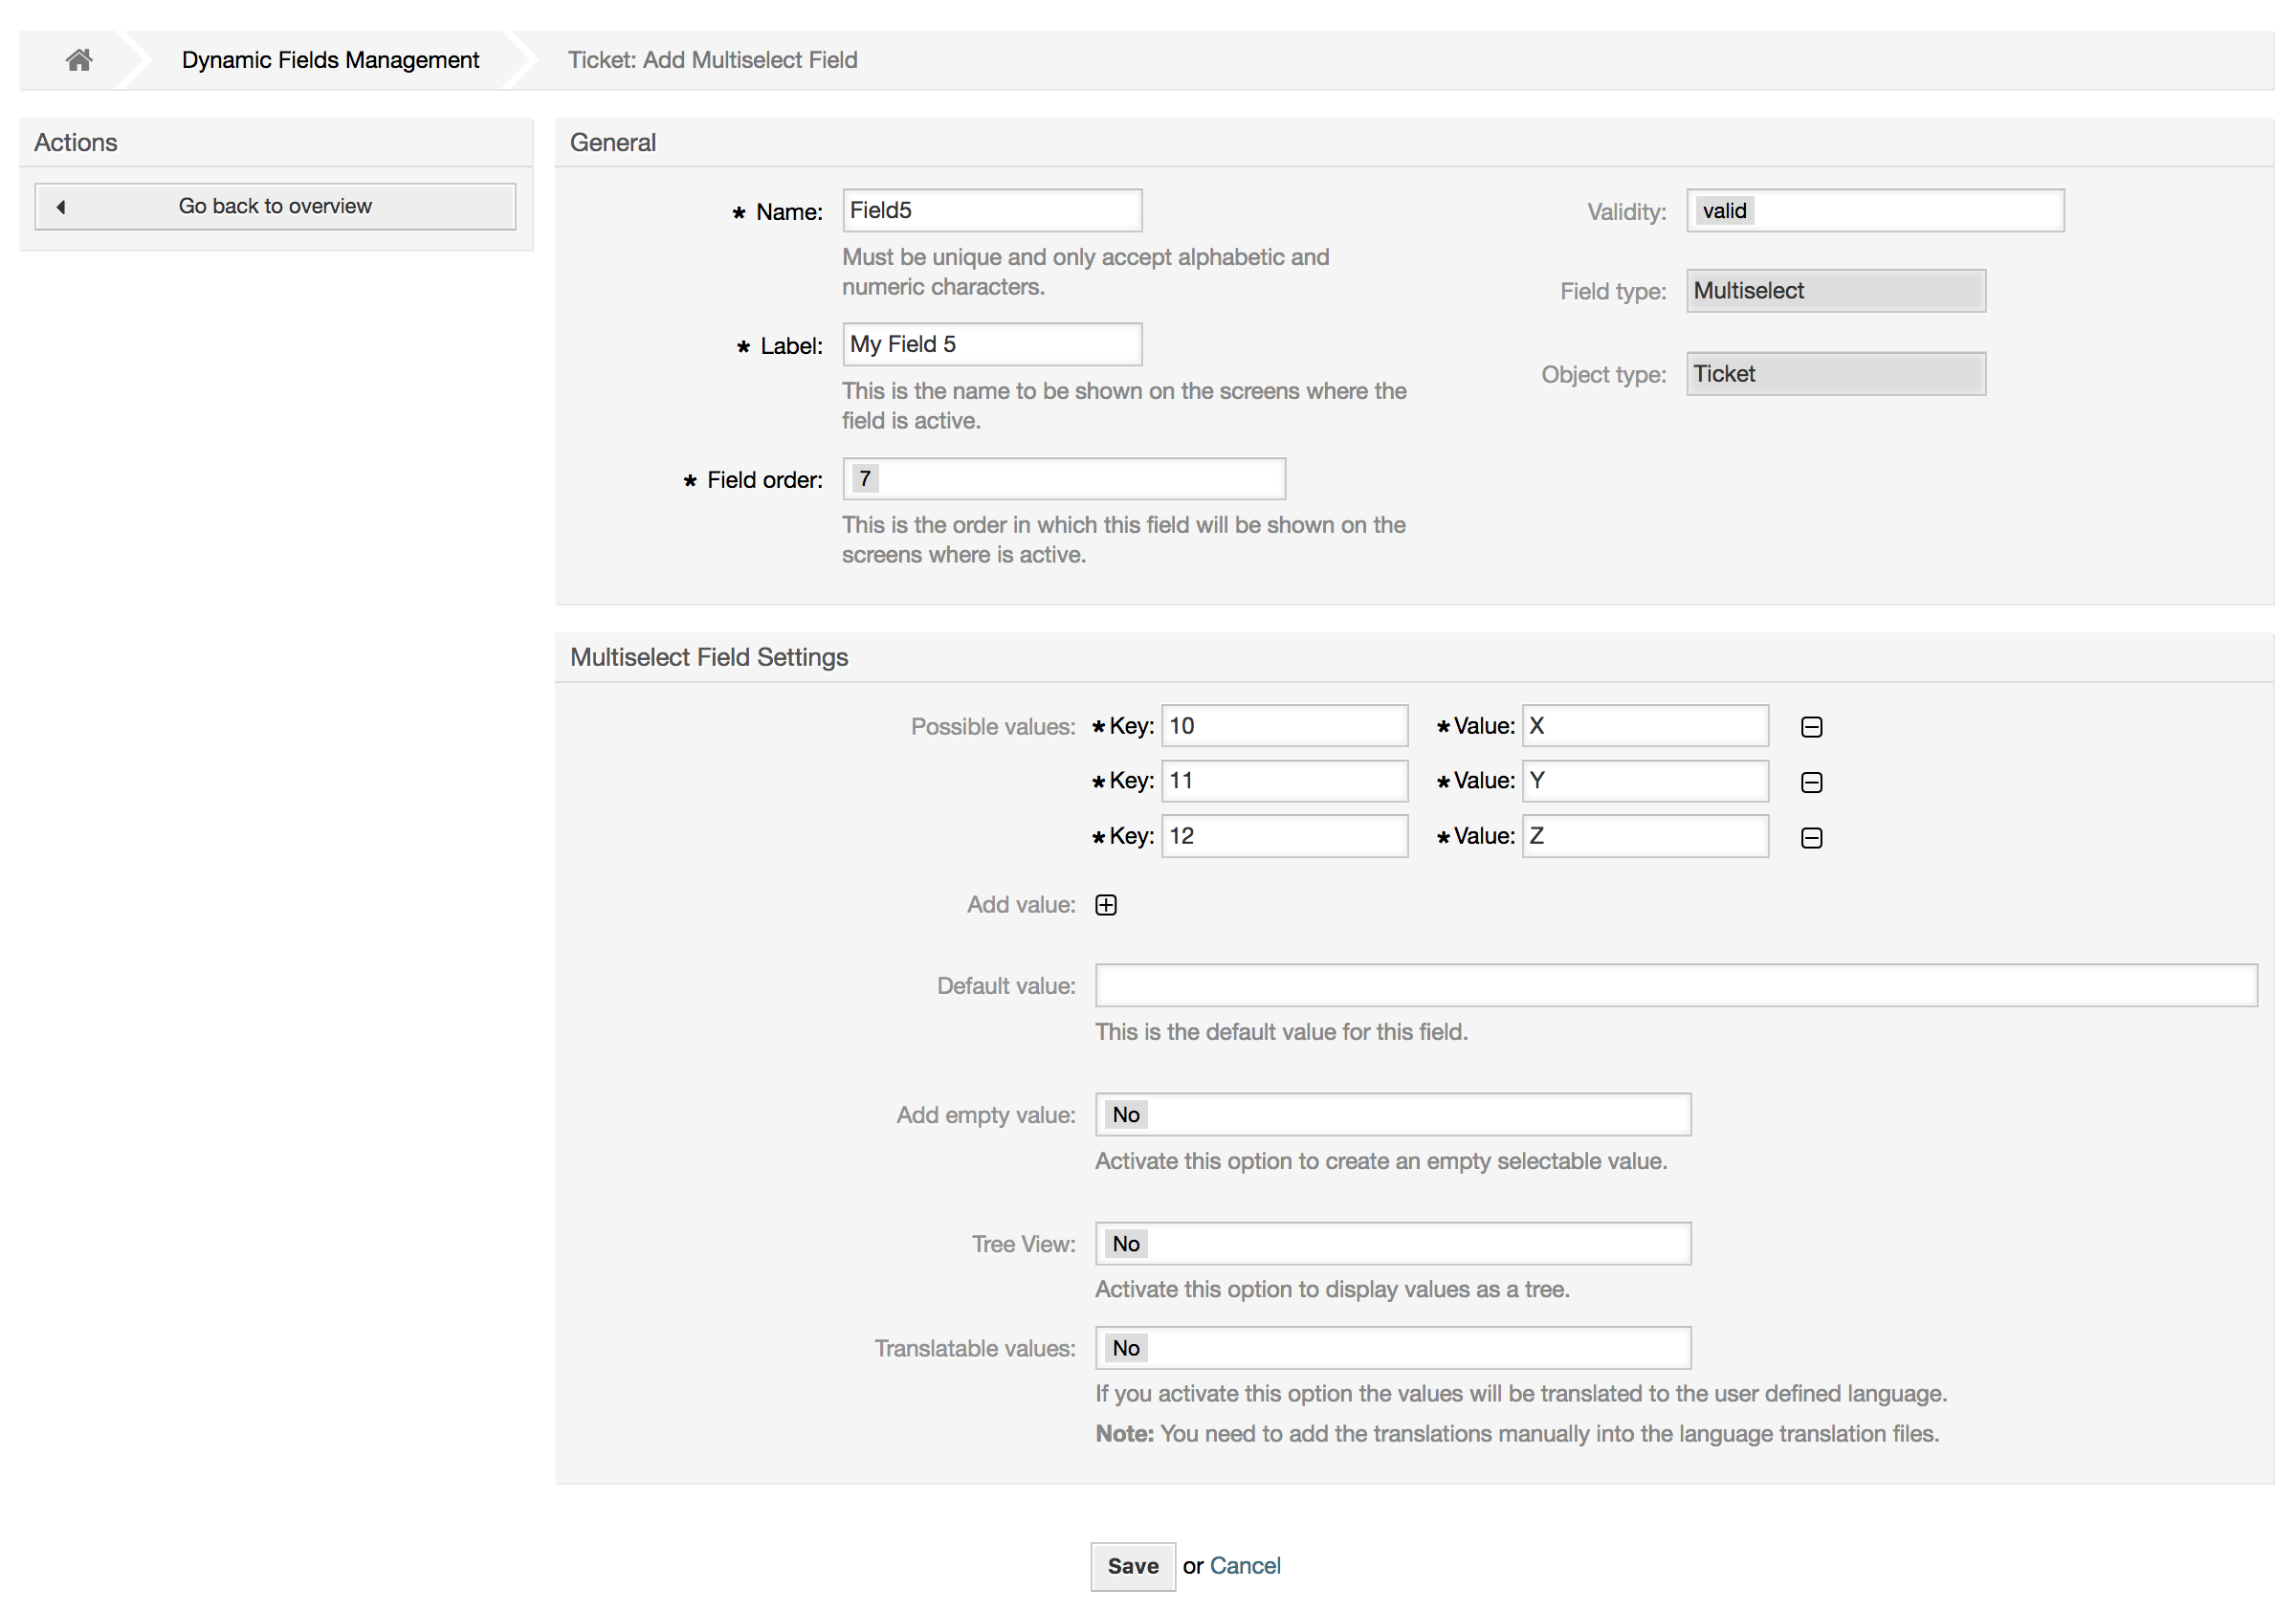
Multiselect dynamic field is used to store multiple values, from a closed list.
Multiselect dynamic field settings:
Possible values: Mandatory.
List of values to choose from. When adding additional list items, it is necessary to specify the Key (internal value) and the Value (display value).
Default value: Optional.
This is the value to be shown by default on the edit screens (like New Phone Ticket or Ticket Compose), the default value for this field is closed selection as defined by the Possible values.
Add empty value: Mandatory, (Yes / No).
If this option is activated an extra value is defined to show as a "-" in the list of possible values. This special value is empty internally.
Translatable values: Mandatory, (Yes / No).
This setting is used mark the possible values of this field to be translated. Only the display values are translated, internal values are not affected, the translation of the values needs to be manually added to the language files.
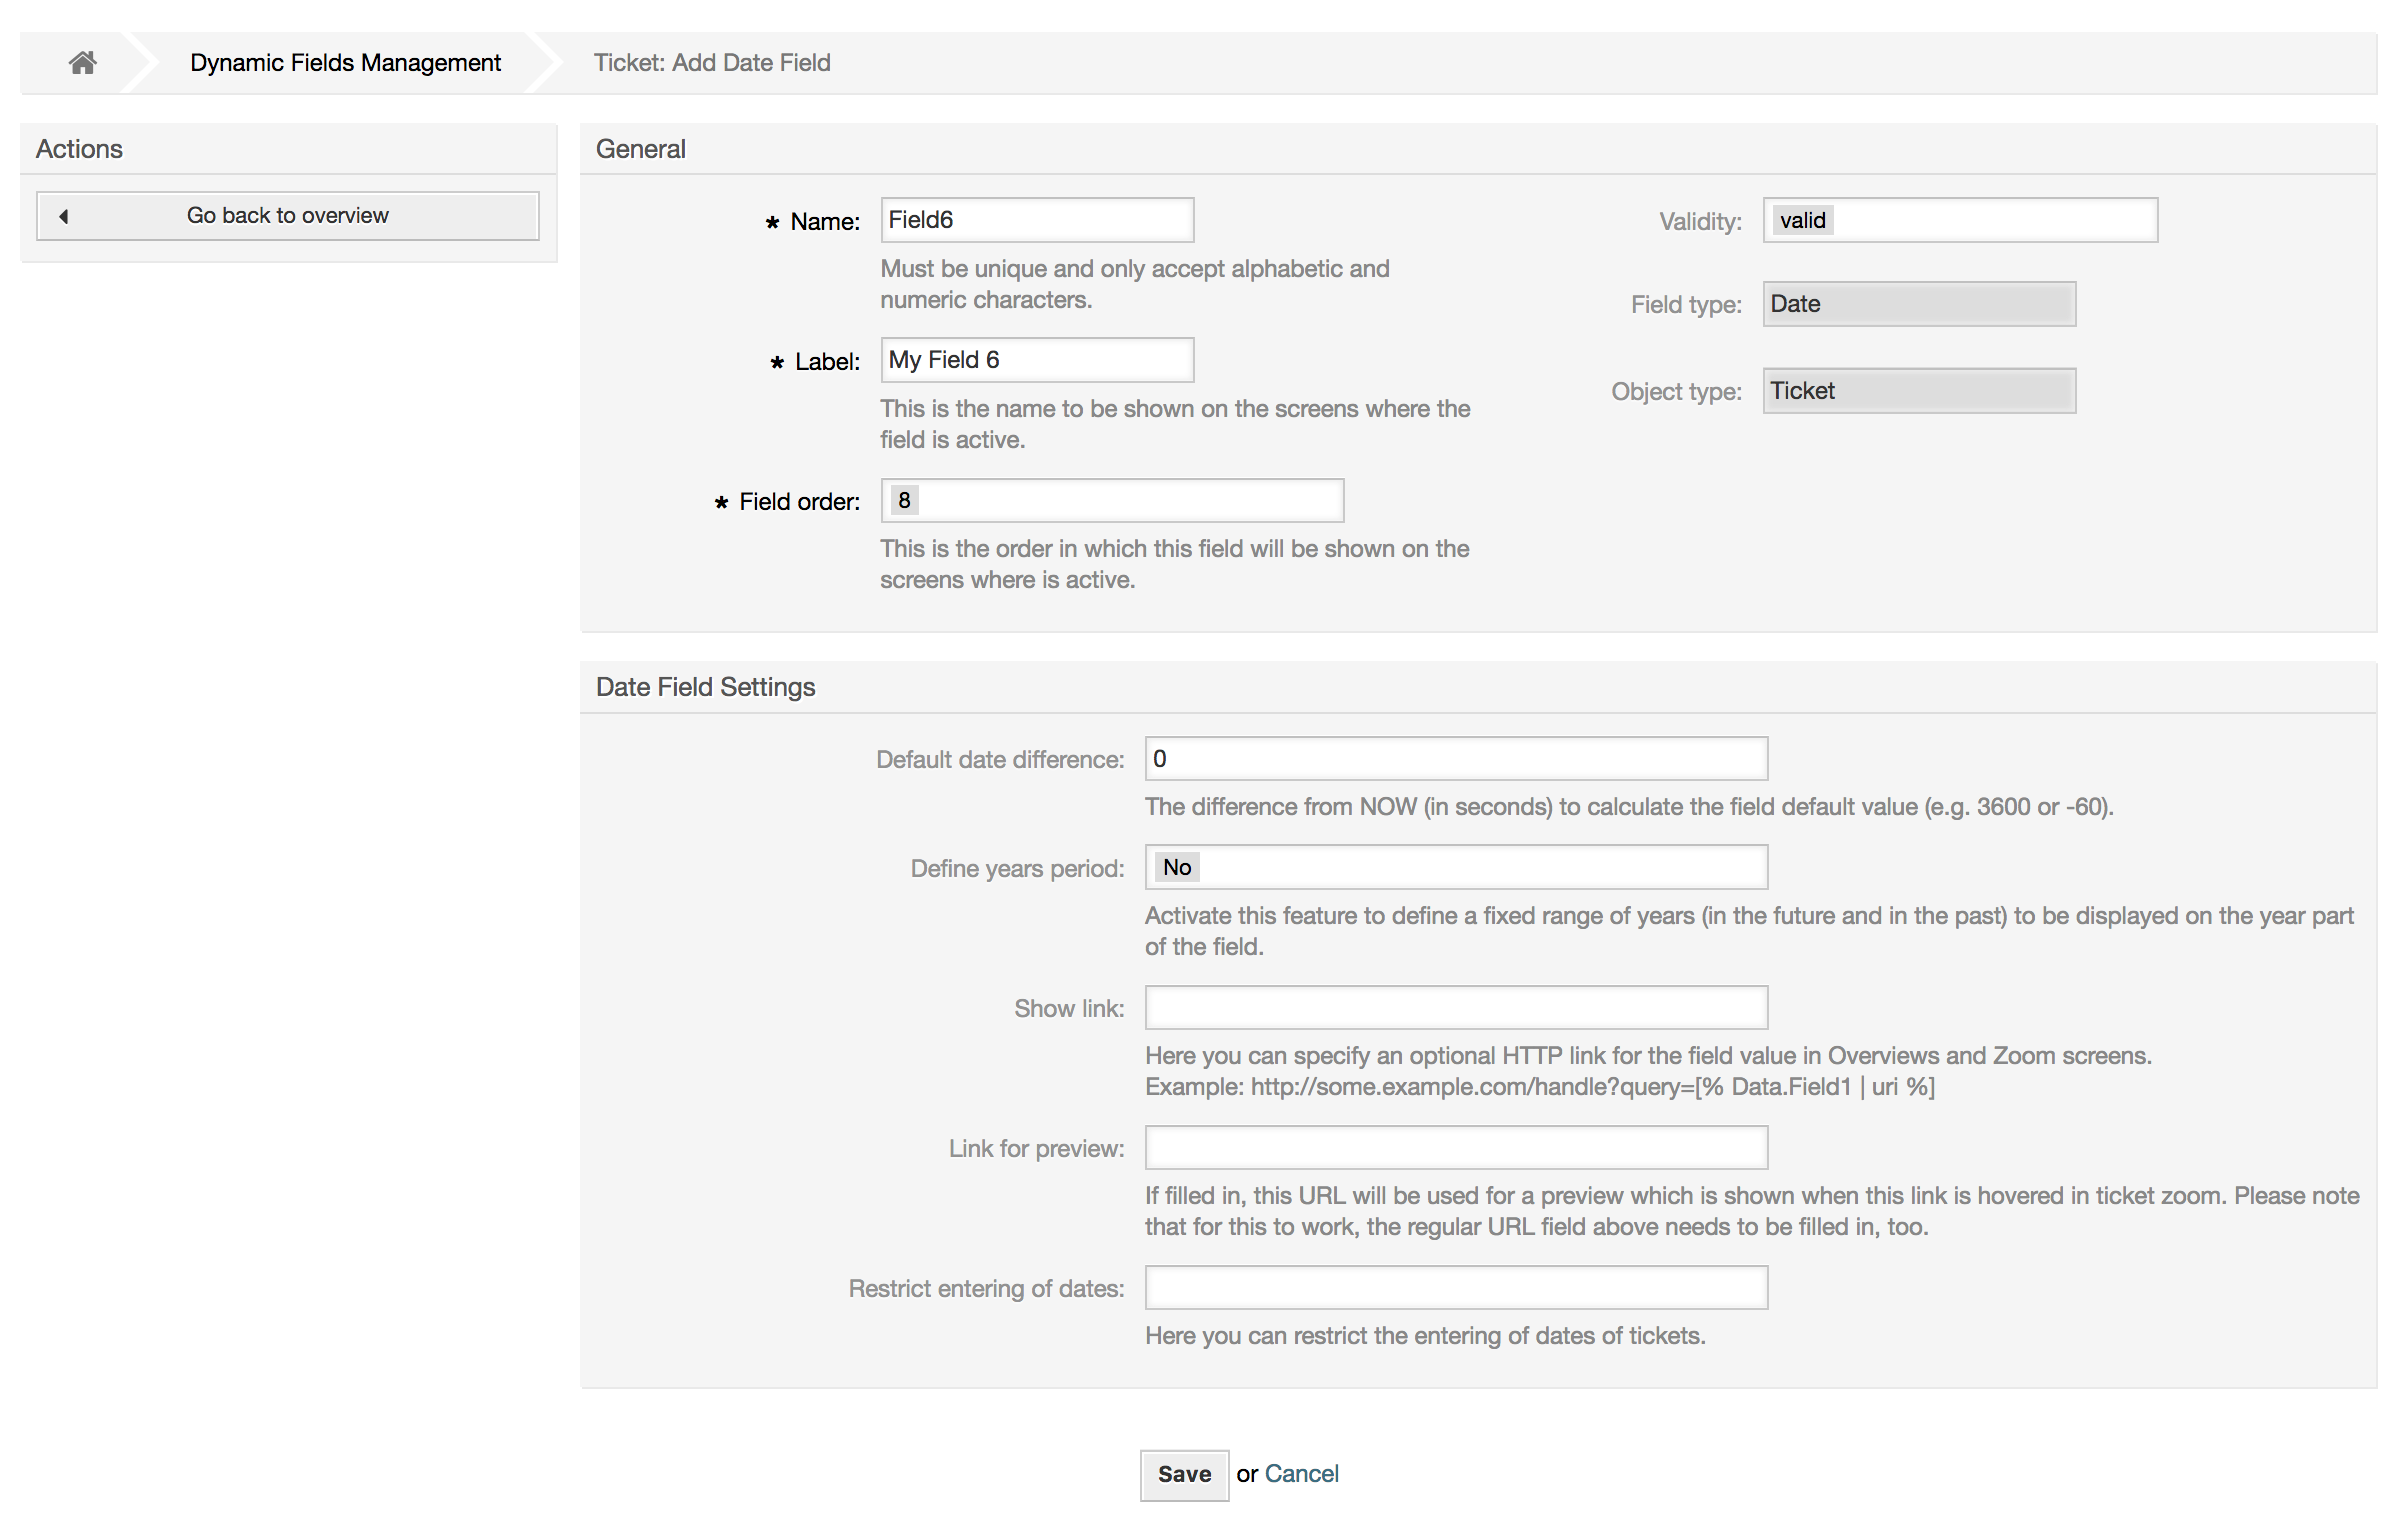
Date dynamic field is used to store a date value (Day, Month and Year).
Date dynamic field settings:
Default date difference: Optional, Integer.
Number of seconds (positive or negative) between the current date and the selected date to be shown by default in the edit screens (like New Phone Ticket or Ticket Compose).
Define years period: Mandatory, (Yes / No).
Used to set a defined number of years in the past and the future based on the current date of the year select for this field. If set to Yes the following options are available:
Years in the past: Optional, Positive integer.
Define the number of years in the past from the current day to display in the year selection for this dynamic field in edit screens.
Years in the future: Optional, Positive integer.
Define the number of years in the future from the current day to display in the year selection for this dynamic field in edit screens.
Show link: Optional.
If set, the field value will be converted into a clickable link for display screens (like ticket zoom or overviews).
For example, if "Show link" is set to "http://www.otrs.com", clicking on the filed value will make your browser to open the OTRS web page.
Note
The use of [% Data.NameX | uri %] in the Set link value, where NameX is the name of the field will add the field value as part of the link reference.
Date / Time dynamic field is used to store a date time value (Minute, Hour, Day, Month and Year).
Date / Time dynamic field settings:
Default date difference: Optional, Integer.
Number of seconds (positive or negative) between the current date and the selected date to be shown by default in the edit screens (like New Phone Ticket or Ticket Compose).
Define years period: Mandatory, (Yes / No).
Used to set a defined number of years in the past and the future based on the current date of the year select for this field. If set to Yes the following options are available:
Years in the past: Optional, Positive integer.
Define the number of years in the past from the current day to display in the year selection for this dynamic field in edit screens.
Years in the future: Optional, Positive integer.
Define the number of years in the future from the current day to display in the year selection for this dynamic field in edit screens.
Show link: Optional.
If set, the field value will be converted into a clickable link for display screens (like ticket zoom or overviews).
For example, if "Show link" is set to "http://www.otrs.com", clicking on the filed value will make your browser to open the OTRS web page.
Note
The use of [% Data.NameX | uri %] in the Set link value, where NameX is the name of the field will add the field value as part of the link reference.

A filled dynamic field overview screen (with the previous examples) should look like:
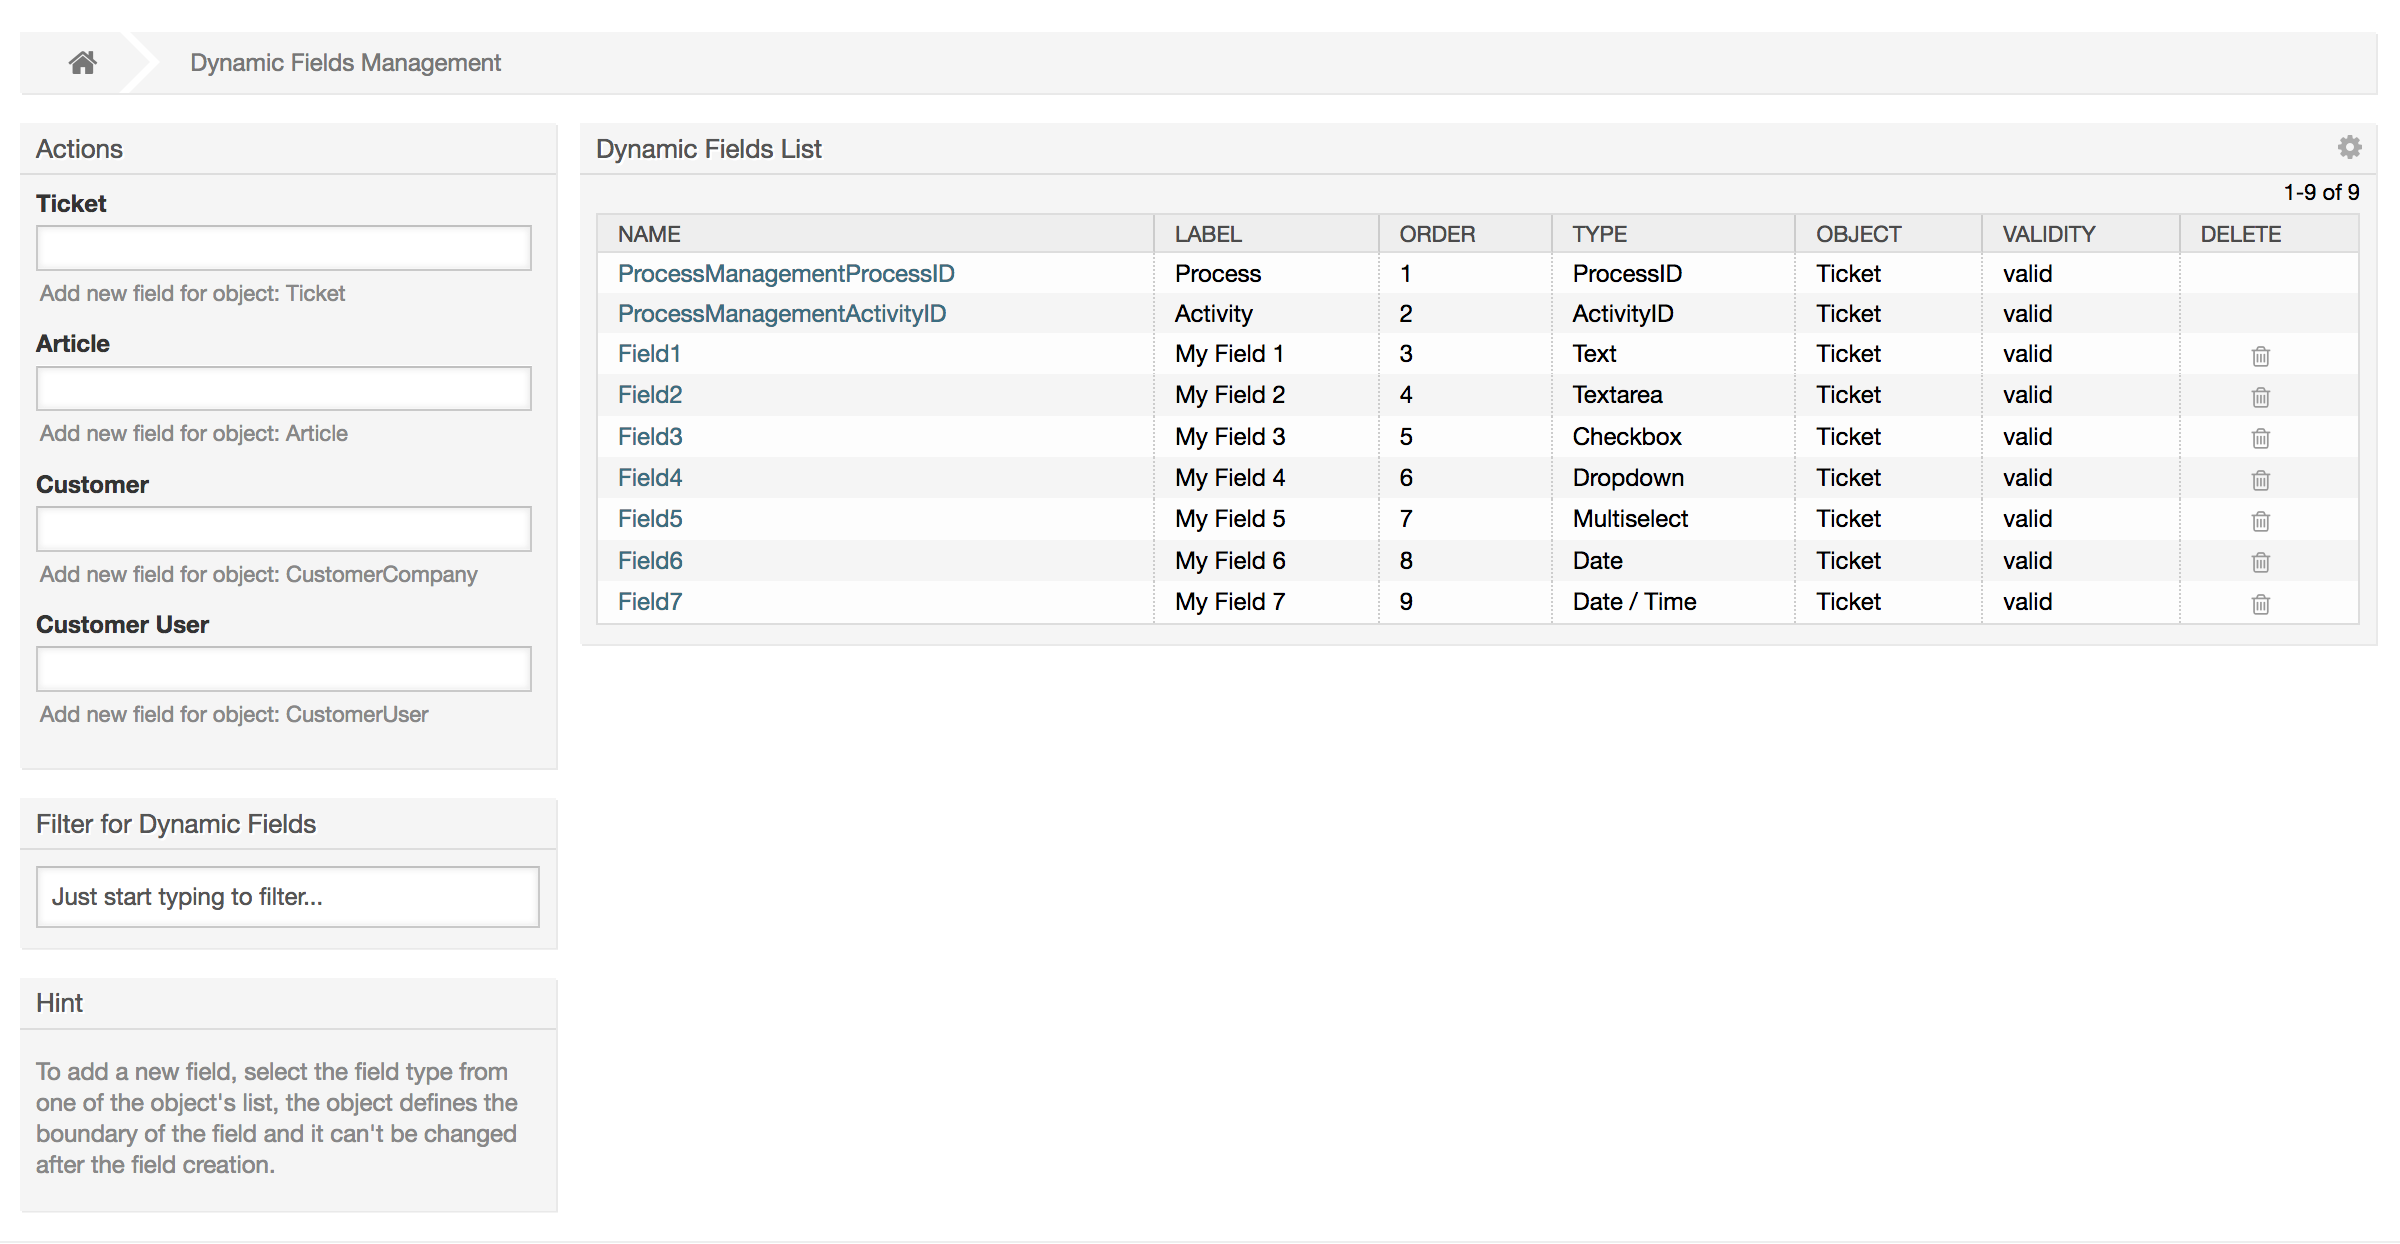
To change or edit a dynamic field you must have at least one field defined, select an already added field from the dynamic fields overview screen and update its settings.
Note
Not all the dynamic field settings can be changed, the Field type and Object type are fixed from the selection of the field and they can't be changed.
It is not recommended to change the field internal name, but the label can be changed at any time. If internal name is changed all "SysConfig" settings that have a reference to that particular field needs to be updated as well as user preferences (if defined).
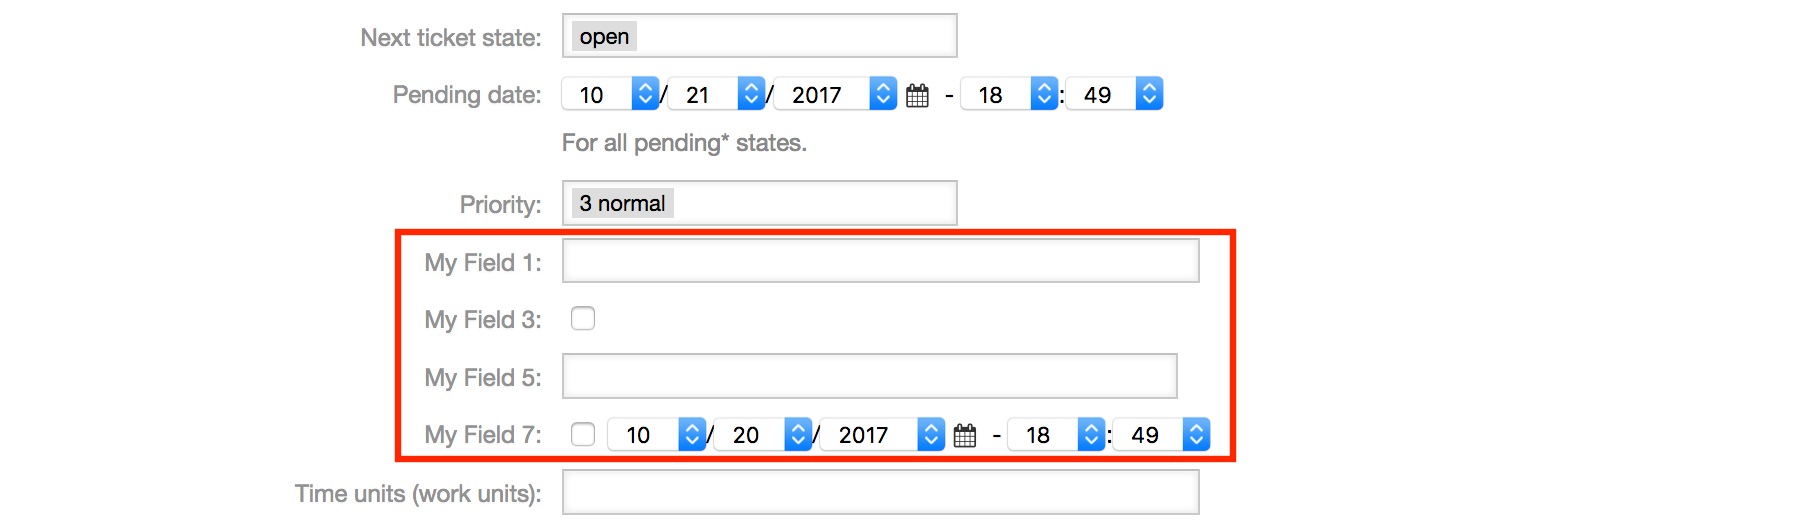
To display a dynamic field on a particular screen there are two mandatory conditions:
The dynamic field must be valid.
The dynamic field must be set to 1 or 2 in the configuration of the screen.
Follow these steps to show a dynamic field in a screen
Be sure that the dynamic field is set to valid, you can see the validity of the field from the dynamic field overview screen. Set to valid by editing the field if necessary.
Open the "sysconfig" and select "Ticket" from the dropdown list in the Actions side bar located in the left part of the screen.
Note
You can also search for "DynamicField" in the search box above or the "sysconfig" key directly if you already know it.
Locate the setting sub-group for the screen that you are looking for and click on it. For example "Frontend::Agent::Ticket::ViewPhoneNew".
Search for the setting that ends with "###DynamicField". For example "Ticket::Frontend::AgentTicketPhone###DynamicField".
If the setting is empty or does not have the required dynamic field name, click on the "+" button to add a new entry. For example Key: Field1, Content: 1.
If the setting already has the dynamic field name listed be sure that is set to "1" to display the field or to "2" to display it as mandatory.
Save the configuration by clicking on the "Update" button at the bottom of the screen and navigate to the screen where you want the field to be displayed.
The following are "sysconfig" configurations examples to show or hide dynamic fields on different screens.


Example 4.27. Activate Field1 in Ticket Overview Small Screens.
Group: Ticket
Sub-group: Frontend::Agent::TicketOverview
Setting: Ticket::Frontend::OverviewSmall###DynamicField
Value:
Key Content Field1 1

This setting affects: Escalation View, Locked View, Queue View, Responsible View, Status View, Service View and Watch View screens.
A ticket event (e.g. TicketCreate) can trigger a value set for a certain field, if the field does not have a value yet.
Note
By using this method this default value, is not seen in the edit screen (e.g. New Phone Ticket) since the value is set after the creation of the ticket.
To activate this feature it is necessary to enable the following setting: "Ticket::EventModulePost###TicketDynamicFieldDefault".
Example 4.28. Activate Field1 in TicketCreate event.
Group: Ticket
Sub-group: Core::TicketDynamicFieldDefault
Setting: Ticket::TicketDynamicFieldDefault###Element1
Note
This configuration can be set in any of the 16 Ticket::TicketDynamicFieldDefault###Element settings.
If more that 16 fields needs to be set up a custom XML file must be places in $OTRS_HOME/Kernel/Config/files directory to extend this feature.
Value:
Key Content Event TicketCreate Name Field1 Value a new value
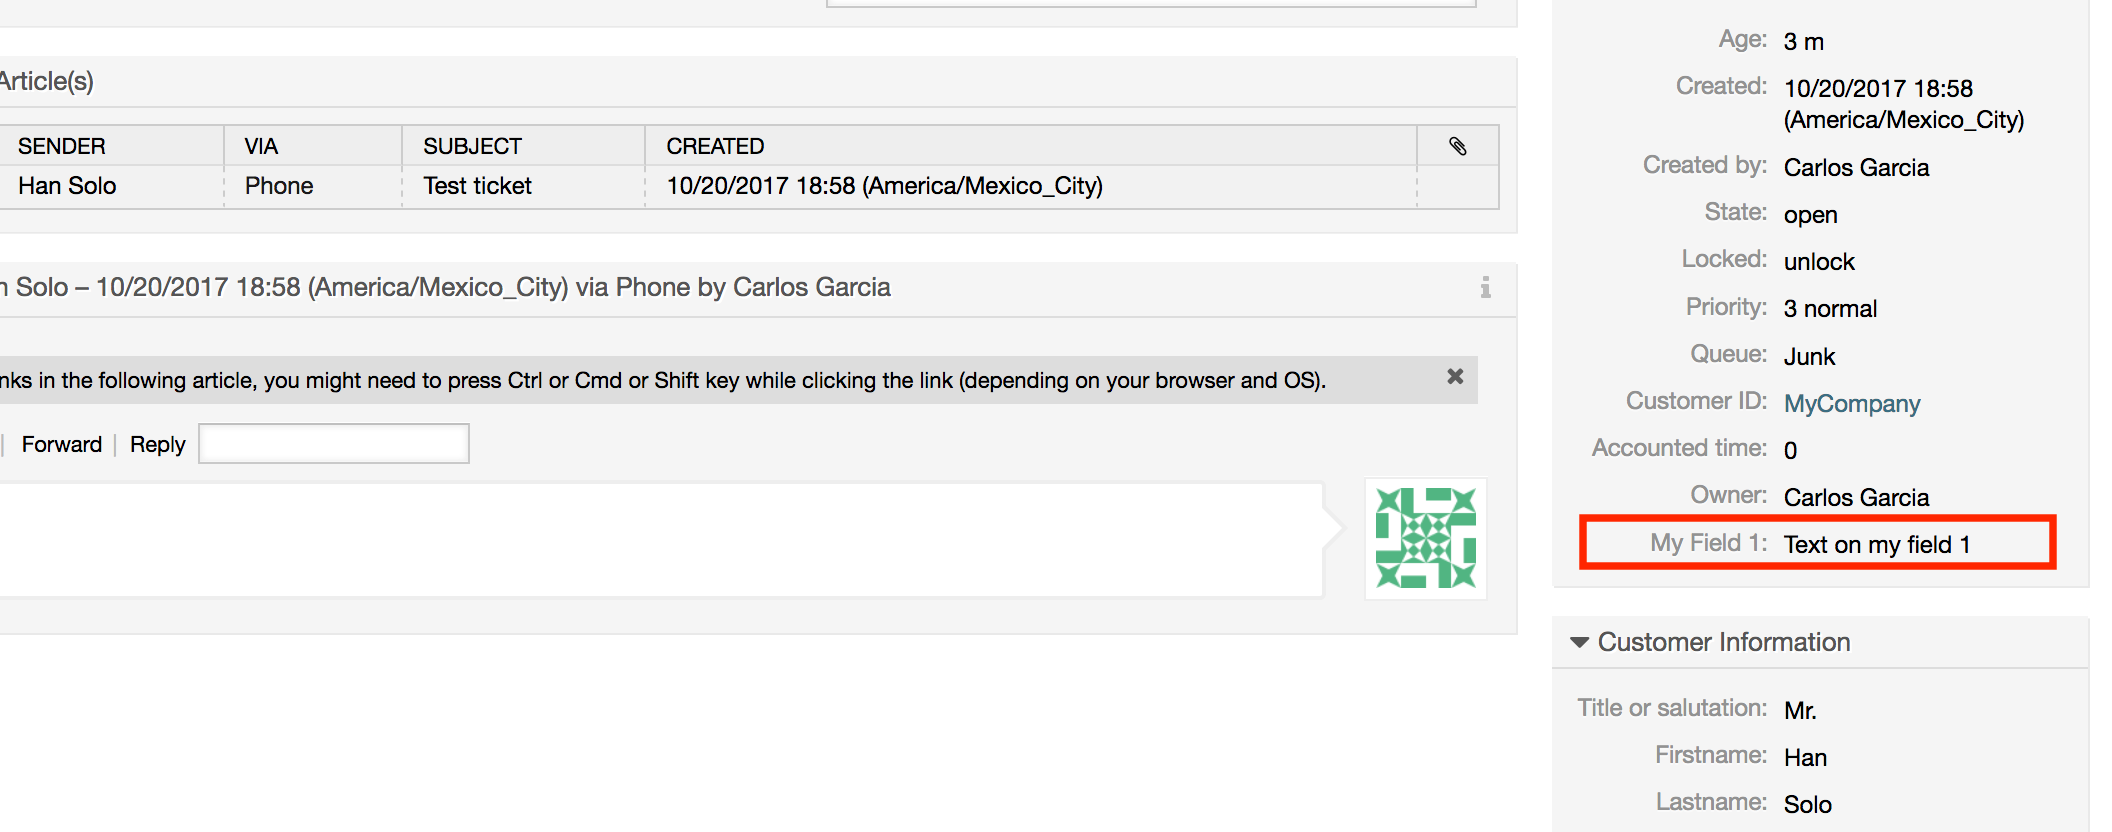
The dynamic field default value can be overwritten with a user defined value stored in the user preferences.
Using this method, the default value of the field will be shown on any screen where the field is activated (if the field does not have already a different value).
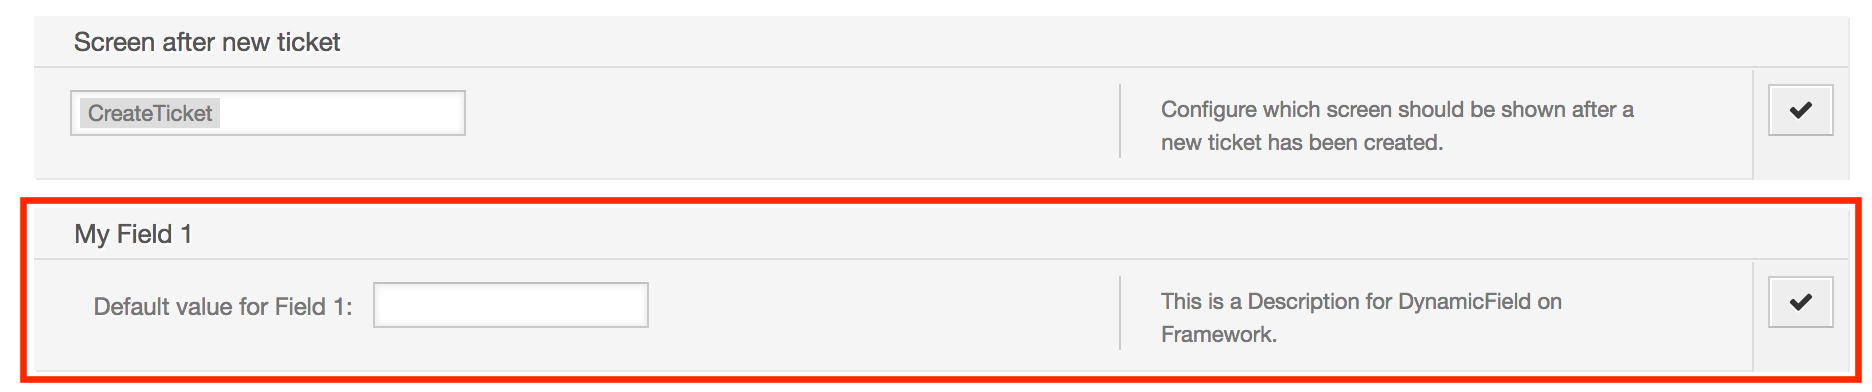
The "sysconfig" setting "PreferencesGroups###DynamicField" located in the "Frontend::Agent::Preferences" Sub-group. This setting is an example of how to create an entry in the User Preferences screen to set an exclusive dynamic field default value for the selected user. The limitation of this setting is that it only permits the use of one dynamic field. If two or more fields will use this feature, it is necessary to create a custom XML configuration file to add more settings similar to this one.
Note
Remember, if more settings are added in a new XML each setting name needs to be unique in the system and different than "PreferencesGroups###DynamicField". For example: PreferencesGroups###101-DynamicField-Field1, PreferencesGroups###102-DynamicField-Field2, PreferencesGroups###My-Field1, PreferencesGroups###My-Field2, etc.
Example 4.29. Activate Field1 in the User preferences.
Group: Ticket
Sub-group: Frontend::Agent::Preferences
Setting: PreferencesGroups###101-DynamicField-Field1
Value:
Key Content Event TicketCreate Active 1 Block Input Column Other Settings Data: [% Env("UserDynamicField_Field1") %] Key: My Field 1 Label: Default value for: My Field 1 Module: Kernel::Output::HTML::PreferencesGeneric PrefKey: UserDynamicField_Field1 Prio: 7000